No offense taken, in fact I have only added to the confusion!
The offical name is actually "Street-Race" as can be seen in the VeeTwo provided specs sheet that came with the cam and I posted earlier in this thread here...
http://www.motoscrubs.com/forum/download/file.php?id=491&mode=view
Kev
1968 250 MK3D rebuild - ex W/C Oil Pump
Moderator: ajleone
-
machten
- Posts: 507
- Joined: Sat Jan 01, 2011 12:57 pm
VeeTwo cam on eBay
http://cgi.ebay.com.au/ws/eBayISAPI.dll?ViewItem&item=270732172514&ssPageName=STRK:MEWAX:IT
An absolute bargain at AU$202. I hope you got it, Bill.
Kev
An absolute bargain at AU$202. I hope you got it, Bill.
Kev
-
wcorey
- Posts: 323
- Joined: Sun Jan 31, 2010 1:50 am
- Location: MA USA
Re: W/C Oil pump
An absolute bargain at AU$202. I hope you got it, Bill.
No, and I'm still kicking myself over it. I had just recently spent down my toy fund and decided that the R/T had gone enough over budget already when this one came along. Bad timing...
Of course I had to made the exception and not wanting to get sucked into the compulsive overbidding thing, I set my limit at $230, shipped. Of course I planned on putting it in right at the end, then watched as a couple bidders went back and forth until it hit my limit with still days to go. Figured with the usual flurry of bids in the last seconds it would go through the roof so I resigned myself to the loss. I purposely didn't watch the end of the auction to avoid an impulse bid and when I saw afterward that it went for only a small amount over, the recriminations started, lol.
I shouldn't be so hard on myself though as there's really no telling what it would've gone up to if the other person kept bidding against me. I keep telling myself that it would have been a shame to have put it in it with used rockers anyway...
Bill
-
Eldert
- Posts: 829
- Joined: Sun Nov 01, 2009 3:23 pm
- Location: Hazerswoude Rijndijk Netherlands
Re: W/C Oil pump
there is another Vee Two desmo cam for sale on E bay .
the seller thinks it is from a belt drive Ducati but it sure looks like a single cam to me
someone should make this guy a offer . item nr 150558096922
Eldert
the seller thinks it is from a belt drive Ducati but it sure looks like a single cam to me
someone should make this guy a offer . item nr 150558096922
Eldert
-
wcorey
- Posts: 323
- Joined: Sun Jan 31, 2010 1:50 am
- Location: MA USA
Re: W/C Oil pump
Hey all,
Did this and wrote it up about a month ago but didn't feel like dealing with the Q&A...
Now that Kev's back, dredging this thread to the surface again (and also to keep Bob hoppin' )
)
It all started innocently enough…
As I wrote here in an earlier post, I had done a quick preliminary setup of my 450d head to make sure I had enough shims within useable range and no surprises, etc. I checked the guides, refaced the valves and cut the seats, checked rockers and cam for excessive wear. Made closer shims to get 0 clearance and stoned the openers to .004” int and .005” ex. It rotated freely and everything seemed ok, I didn’t bother to leave a feeler in to take up the clearance, just didn’t think of it at the time I guess. It’s been quite a while since I’ve done desmo clearances.
Then this thread started, the binding issue came up and I’m doing the final motor assembly so it’s time to do the head for real. First thing I did was put a feeler in the int opener to take up the clearance and stated to rotate the cam, very quickly bound up. Backed off to a .002” feeler, got a bit further but still binding. Repeated the procedure on the ex side with the same result. Turns out, I had exactly enough clearance at .004int/.005ex to clear 360 degrees rotation, one more thousandth and both started to bind. Similar to Kev’s, the majority of the problem was in a relatively small place,
about 20 degrees of rotation. Both were worst in the same spot, right where the valve starts to ramp from open to closed and then a smaller amount just where they begin to open. Thankfully because of this, the affected area’s are relatively small, only a ¼” or so.
I know I could have just left it alone and things would have worked fine…
I never actually had the cam out of the head until this point and hadn’t noticed any unusual wear on the lobe faces. I had noted some scoring on the opening rockers and planned on cleaning them up. Now that I was scrutinizing the area of contention, I could see some light scoring on the opener cam lobes, not coincidentally right where the binding was. And the area of the rockers (closest to the pivot) that contact this part of the cam were also where the scoring was deepest, mostly on the openers.
Upon removal and close inspection/analysis, it seems likely that someone had done just what I had and set the clearances at tdc, but probably in the bike and didn’t detach anything to enable the cam to be rotated independently of the motor. As such it’s likely the binding wasn’t noticed and it was run like that and the high spots were worn down to the point where I found them. Most of the wear seemed to manifest itself on the rockers rather than the cam. I stoned the rockers down and was surprised how much (relatively) softer they are then the cam. The hard face material is pretty thick too, I took a few thou off in places and kept checking to make sure I wasn’t going through and never did. I found that an ex-acto blade will scratch the body material of the rocker but slides across the hardface (stellite?) like glass.
I decided to dress the cam down to clean up the scoring and also see if that would improve things a bit. It did but by only a tiny amount, probably .0005” and got a few additional degrees of free rotation. That small step started what would end up a whole day of work, making it ‘right’, lol.
Just as a disclaimer, I spent some time in the past as a precision (manual) machinist, and have been somehow involved in it my whole career. Including the time spent as a kid in my dad’s basement shop and the modest shop now in my own basement I’ve a good solid 40 years of it and I’m fairly comfortable working in tenths of thousandths.
Also I have a ‘rig’ I made years ago for cleaning up and/or re profiling brit bike cams and tappets, so I’m not entirely out of my element here. Well, just a bit maybe.
Of course re profiling a desmo cam is a another whole level of complexity from non desmo due to the synchronization of the opener/closer lobes. Then I find that the abrasive wheel on my old cam grinding setup is too wide to get between the individual lobes on the desmo cam and I don’t have a narrow one with enough diameter to work. Plus it’s only one cam so I’m not about to spend more time setting something up than it would to do it by hand stoning.
(Speaking of which, unless you’ve ever attempted it, it’s difficult to appreciate just how much effort is involved to manually stone even .001” from a piece of heat treated steel.)
What I did would likely make some of you cringe and I wouldn’t recommend it to just anyone.
I reamed a 10mm hole in the center of a 6” square of 3/4” aluminum plate so the bearing block end of the cam could just rotate in it, I chucked a small 3” grinding wheel on a drill press and dressed it very square with the table. So with the ali plate sitting on the drill press table, the cam now sits exactly perpendicular to the wheel and the dp table can be moved up/down to line the wheel up with each lobe.
Now it was just a matter of locating the offending high areas and carefully grinding/blending them by pushing and rotating the cam into the wheel, the plate being able to slide around while still keeping the cam square. Did this very slowly, taking off few.0000”s then assembling the head and re assessing. Assembled/disassembled the head dozens of times, my fingers were sore from rotating the cam. The pins and cam bearing carrier started out pretty tight but I could work them in/out by hand by the time I was done. I used a sharpie (like Prussian blue) to coat the cam and rockers faces to find and eliminate points of partial contact and high/low spots. As I said earlier the worst areas that needed removal were thankfully small, a ¼” or so with another ¼” or so of blending on either side. I mostly split the difference from where I removed material between the opener and closer lobes.
After all that I only removed .002” of bind from the int and .003” ex, so I still have almost .002” of bind left on each. The real up side is I now have a very nice cam/rocker surface finish and good even contact so at this point I don’t want to push it and mess something up this late in the game. It gets very fussy at this point as the high spots now only cover a few degrees and if you ‘miss’ and grind a little off to one side, a low spot would be created and you can’t get it back or correct everything then without grinding most of the way around the lobe, I say no thanks to that...
Did this and wrote it up about a month ago but didn't feel like dealing with the Q&A...
Now that Kev's back, dredging this thread to the surface again (and also to keep Bob hoppin'
It all started innocently enough…
As I wrote here in an earlier post, I had done a quick preliminary setup of my 450d head to make sure I had enough shims within useable range and no surprises, etc. I checked the guides, refaced the valves and cut the seats, checked rockers and cam for excessive wear. Made closer shims to get 0 clearance and stoned the openers to .004” int and .005” ex. It rotated freely and everything seemed ok, I didn’t bother to leave a feeler in to take up the clearance, just didn’t think of it at the time I guess. It’s been quite a while since I’ve done desmo clearances.
Then this thread started, the binding issue came up and I’m doing the final motor assembly so it’s time to do the head for real. First thing I did was put a feeler in the int opener to take up the clearance and stated to rotate the cam, very quickly bound up. Backed off to a .002” feeler, got a bit further but still binding. Repeated the procedure on the ex side with the same result. Turns out, I had exactly enough clearance at .004int/.005ex to clear 360 degrees rotation, one more thousandth and both started to bind. Similar to Kev’s, the majority of the problem was in a relatively small place,
about 20 degrees of rotation. Both were worst in the same spot, right where the valve starts to ramp from open to closed and then a smaller amount just where they begin to open. Thankfully because of this, the affected area’s are relatively small, only a ¼” or so.
I know I could have just left it alone and things would have worked fine…
I never actually had the cam out of the head until this point and hadn’t noticed any unusual wear on the lobe faces. I had noted some scoring on the opening rockers and planned on cleaning them up. Now that I was scrutinizing the area of contention, I could see some light scoring on the opener cam lobes, not coincidentally right where the binding was. And the area of the rockers (closest to the pivot) that contact this part of the cam were also where the scoring was deepest, mostly on the openers.
Upon removal and close inspection/analysis, it seems likely that someone had done just what I had and set the clearances at tdc, but probably in the bike and didn’t detach anything to enable the cam to be rotated independently of the motor. As such it’s likely the binding wasn’t noticed and it was run like that and the high spots were worn down to the point where I found them. Most of the wear seemed to manifest itself on the rockers rather than the cam. I stoned the rockers down and was surprised how much (relatively) softer they are then the cam. The hard face material is pretty thick too, I took a few thou off in places and kept checking to make sure I wasn’t going through and never did. I found that an ex-acto blade will scratch the body material of the rocker but slides across the hardface (stellite?) like glass.
I decided to dress the cam down to clean up the scoring and also see if that would improve things a bit. It did but by only a tiny amount, probably .0005” and got a few additional degrees of free rotation. That small step started what would end up a whole day of work, making it ‘right’, lol.
Just as a disclaimer, I spent some time in the past as a precision (manual) machinist, and have been somehow involved in it my whole career. Including the time spent as a kid in my dad’s basement shop and the modest shop now in my own basement I’ve a good solid 40 years of it and I’m fairly comfortable working in tenths of thousandths.
Also I have a ‘rig’ I made years ago for cleaning up and/or re profiling brit bike cams and tappets, so I’m not entirely out of my element here. Well, just a bit maybe.
Of course re profiling a desmo cam is a another whole level of complexity from non desmo due to the synchronization of the opener/closer lobes. Then I find that the abrasive wheel on my old cam grinding setup is too wide to get between the individual lobes on the desmo cam and I don’t have a narrow one with enough diameter to work. Plus it’s only one cam so I’m not about to spend more time setting something up than it would to do it by hand stoning.
(Speaking of which, unless you’ve ever attempted it, it’s difficult to appreciate just how much effort is involved to manually stone even .001” from a piece of heat treated steel.)
What I did would likely make some of you cringe and I wouldn’t recommend it to just anyone.
I reamed a 10mm hole in the center of a 6” square of 3/4” aluminum plate so the bearing block end of the cam could just rotate in it, I chucked a small 3” grinding wheel on a drill press and dressed it very square with the table. So with the ali plate sitting on the drill press table, the cam now sits exactly perpendicular to the wheel and the dp table can be moved up/down to line the wheel up with each lobe.
Now it was just a matter of locating the offending high areas and carefully grinding/blending them by pushing and rotating the cam into the wheel, the plate being able to slide around while still keeping the cam square. Did this very slowly, taking off few.0000”s then assembling the head and re assessing. Assembled/disassembled the head dozens of times, my fingers were sore from rotating the cam. The pins and cam bearing carrier started out pretty tight but I could work them in/out by hand by the time I was done. I used a sharpie (like Prussian blue) to coat the cam and rockers faces to find and eliminate points of partial contact and high/low spots. As I said earlier the worst areas that needed removal were thankfully small, a ¼” or so with another ¼” or so of blending on either side. I mostly split the difference from where I removed material between the opener and closer lobes.
After all that I only removed .002” of bind from the int and .003” ex, so I still have almost .002” of bind left on each. The real up side is I now have a very nice cam/rocker surface finish and good even contact so at this point I don’t want to push it and mess something up this late in the game. It gets very fussy at this point as the high spots now only cover a few degrees and if you ‘miss’ and grind a little off to one side, a low spot would be created and you can’t get it back or correct everything then without grinding most of the way around the lobe, I say no thanks to that...
-
DewCatTea-Bob
- Posts: 2897
- Joined: Sun Nov 01, 2009 10:53 am
- Location: Near SE side of Lake Michigan
DESMO-cam Binding-point Elimination
____ Bill, I understand your entire post and I realize what you've gone through, (it's at least as taskful as you've indicated).
____ Where you've speculated that someone must've set the clearances at TDC while the head remained on the engine, is a common misjudgement and not only leads to the wear you've mentioned, but also causes the rocker-pins to somewhat enlongate their associated holes within the cyl.head.
The simplest way to cope with the binding issue is to simply not bother with setting the closing clearance down to 'zero' ! _ As clearance amounts as high as .020" are unimportant to be very concerned with (when closing-springs are retained), and a little closing-clearance slop actually leads to better engine-part life (than those zero-settings).
__ I'm not saying that someone like yourself shouldn't have bothered to do what you did,
only that others need not be concerned about doing the same.
Dukaddy-DUKEs,
-Bob
PLEASE NOTE... If this-post is not-yet signed-off with '-Bob', then I'm still in the process of completing it,, and if not also included with 'DCT' near bottom as well, then I may edit this post's wording at a later time. - Dct.Bob
-
machten
- Posts: 507
- Joined: Sat Jan 01, 2011 12:57 pm
Re: W/C Oil pump
Ahhhhh, Bill,
Welcome to my nightmare! I agree with what Bob had to say, about "just leave it and run it loose" for most, but I do like my desmos to run quieter than springers and whirr rather than clack. And after all, that was Dr T's plan. All I can say is "well done" on your engineering and when can I send you a few cams to do your magic on?
Kev
-
machten
- Posts: 507
- Joined: Sat Jan 01, 2011 12:57 pm
Desmo closer shim source
I've been slow to come back to this because I've been busy working on a similar area with my bevel twins. I've now installed some offset cam keys in my 74 750 Sport (10 degree mismatch front to rear) and look forward to checking out performance on the road.
The other impediments were that I wanted to get a good feeling for "normal" with the current stock cam by riding the 250 MK3D a bit (well, a lot, actually) and I wanted to source enough desmo closer shims to set the best clearances i could on the V2 cam (and was having difficulty sourcing).
I'll be trying the the V2 cam shortly, but the major purpose of this post is to let people know that I sourced an excellent selection of desmo closer shims at a very reasonable price through Nigel Lacey's website. Communication and delivery was top shelf.
Kev
-
wcorey
- Posts: 323
- Joined: Sun Jan 31, 2010 1:50 am
- Location: MA USA
Re: W/C Oil pump
Kev, I've been following your thread on Ducati.ms, had similar issues with the 996 back when they were the current model and no one had worked it out yet. Some of my cams were off by as much as 12 degrees and all were out by at least a couple, plus the lobe centers were found to work better at other than stock settings. You could also tune to put the power at higher or lower rpm's, I typically go for a stronger mid range.
It's kind of funny in your situation, tuning by 'bark', lol. I've noticed compression also has a noticeable effect on the exhaust note, hi-comp brings out a more sharp, defined tone.
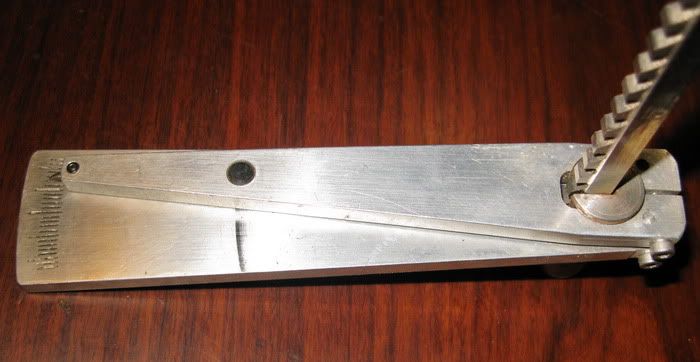
Offset key were expensive ( adjustable cam pulleys even much more so), difficult to find, and were also being questioned as to reliability. So I made a fairly simple, index-able tool to broach new keyways into the stock pulleys, I would think you could do the same for bevel gears.
Closer shims are really easy to make on a lathe, so I've set up my closers by swapping around shims originally from both valves, then measured the stack and spun up a single one of the same dimension.
Seems your all set there though, Nigel's (Lacey Engineering) prices and selection are great and they're really nice people to deal with.
Still looking forward to the v2 report...
Bill
It's kind of funny in your situation, tuning by 'bark', lol. I've noticed compression also has a noticeable effect on the exhaust note, hi-comp brings out a more sharp, defined tone.
Offset key were expensive ( adjustable cam pulleys even much more so), difficult to find, and were also being questioned as to reliability. So I made a fairly simple, index-able tool to broach new keyways into the stock pulleys, I would think you could do the same for bevel gears.
Closer shims are really easy to make on a lathe, so I've set up my closers by swapping around shims originally from both valves, then measured the stack and spun up a single one of the same dimension.
Seems your all set there though, Nigel's (Lacey Engineering) prices and selection are great and they're really nice people to deal with.
Still looking forward to the v2 report...
Bill
-
machten
- Posts: 507
- Joined: Sat Jan 01, 2011 12:57 pm
Re: W/C Oil pump
Apologies for any non single context below. Normal service will be resumed soon...
Some of my cams were off by as much as 12 degrees and all were out by at least a couple, plus the lobe centers were found to work better at other than stock settings. You could also tune to put the power at higher or lower rpm's, I typically go for a stronger mid range.
Bill, you clearly already know what I've been learning. So I assume you advanced the cam timing for improved mid range?
I've got a bunch of data and graphs that I haven't published openly because I just don't have time to answer the questions, but PM me and I'll send it to you.
Offset keys for belts seem stupidly expensive. When I rang Phil Hitchcok from Road and Race to order mine, he made an immediate point of asking me if this was for one of my bevels, or had I bought a belt. Apparently he's had all number of people with belts trying to buy the keys for bevels (4mm vs 3mm).
You're pictured tool is one serious piece of kit - I've never seen one before, but what a brilliant idea!
Singles discussion resumed...
I don't have a lathe (wish I did, and I will have that some time. Won't be long and home CNC will be a reality), and I was struggling to find the shims. Can't speak highly enough of Nigel's parts and Edina's communication and delivery.
V2 cam report is probably 3 weeks away, but no more.
Kev
Return to “Ducati Singles Main Discussions (& How to Join)”
Who is online
Users browsing this forum: No registered users and 55 guests