This is a great thread. Wish it had existed when I stripped my 250 down a while ago.
I still haven't reassembled my engine though, so your thread is becoming more useful by the day!
I have a question about new bearings but I'll put it in a separate post.
Great work.
New 250 Project Adventure
Moderator: ajleone
-
Snakeoil
- Posts: 109
- Joined: Fri Jun 17, 2016 12:10 pm
- Location: Upstate NY
Re: New 250 Project Adventure
Thanks for the kind words. Posting a thread like this serves two purposes. It helps me in that others may see an error or be able to help with a question/issue and it also helps the next guy who has never been into one of these before.
Meanwhile back at the ranch, I talked to my buddy that I got the bike from and as soon as the heat breaks a bit, we are headed out to his storage container to dig thru his stash to get the rest of what I'll need to complete the bike. Told him about the head with the compression release and he said he's got plenty of heads.
Rob
-
Snakeoil
- Posts: 109
- Joined: Fri Jun 17, 2016 12:10 pm
- Location: Upstate NY
Re: New 250 Project Adventure
Stripped the rest of the chassis down today. It's just been too hot and humid to work in the barn these past few weeks.
Did something I have not done since I was a kid. Loosened the top tree and lowered the bottom tree and stem out of the steering head and heard, tink, plink, ping, ding... only what sounded like a million times more. Of course, it was the steering head balls falling out, bounding off my lift and anything else in their path. I pulled the stem out and as I put it on the back of the lift, I heard more evacuating the area. I returned to the steering head to see one bounce off the lift table fly thru the air, hit the floor and roll under a car parked in the barn.
I had to laugh at this. Decided I did not care. Individual ball bearings are easy to come by. When I got done, I picked up all I could find, including the one under the car. I found 44. So, I checked the parts book and saw that their should be 48. Now, of course, I have no way of knowing if there were 48 in there to begin with since I'm sure those balls had been out of there before at some point. But for giggles, I looked for the others, not caring if I found them or not. That apparently is the secret. It took all of about 2 minutes to find the missing 4 balls. Amazing.
Pulled the swingarm and found this.
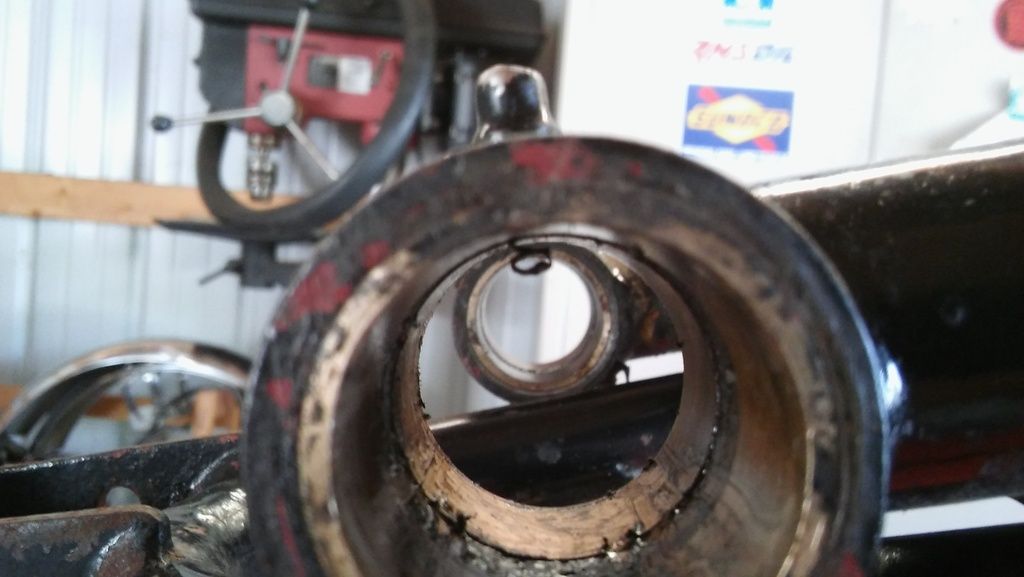
I see that they are pressed in grease fittings. Might replace them with threaded fittings. Pulled them both out since everything is getting painted.
Otherwise, the swingarm fit is perfect with zero slop.
That's it for now. Will probably strip the wheels apart tomorrow.
Rob
-
Snakeoil
- Posts: 109
- Joined: Fri Jun 17, 2016 12:10 pm
- Location: Upstate NY
Re: New 250 Project Adventure
Pulled the forks apart today. No surprises. Actually a little better than I expected.
There is no disassembly procedure in the manual. You are supposed to reverse the assembly procedure. When you read it, it makes these forks sound like the most complicated things every put on a bike. So, here is how you take them apart. You remove the allen head bolt in the bottom of the sliders and the tubes slide out. It's that simple. Inside the tubes are the damper rods and springs. The spring drags on the ID of the tube so you have to pull it out with a piece of hooked wire. Piece of cake.
Fork tubes are a bit rusty and have some pitting on them.
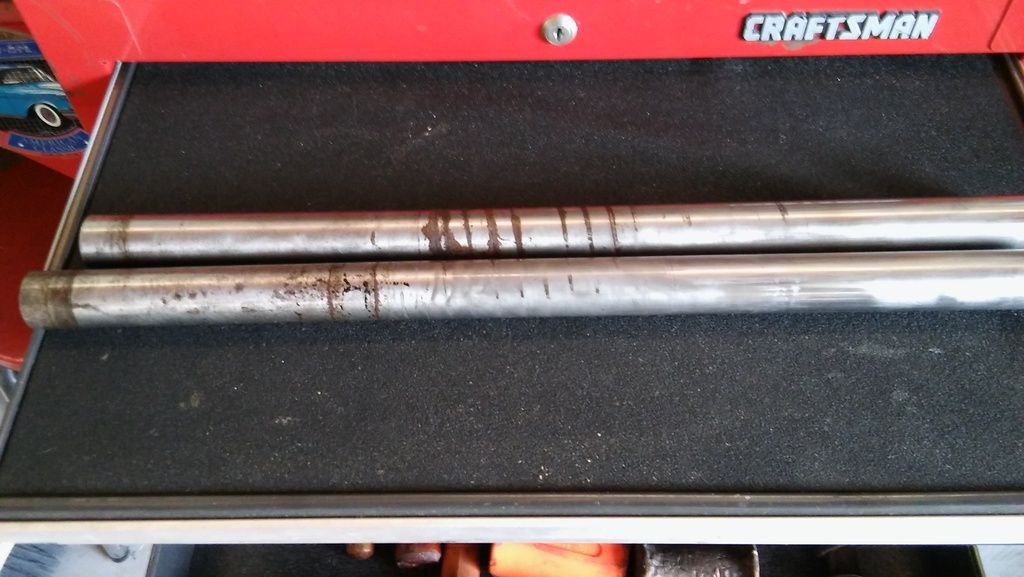
I will reassemble them dry and determine the limits of the seal area. Then it is pretty simple to repair with epoxy and then sand them smooth again. Might not be able to do it here as my lathe might not be big enough. Will check tomorrow. Big lathe is home.
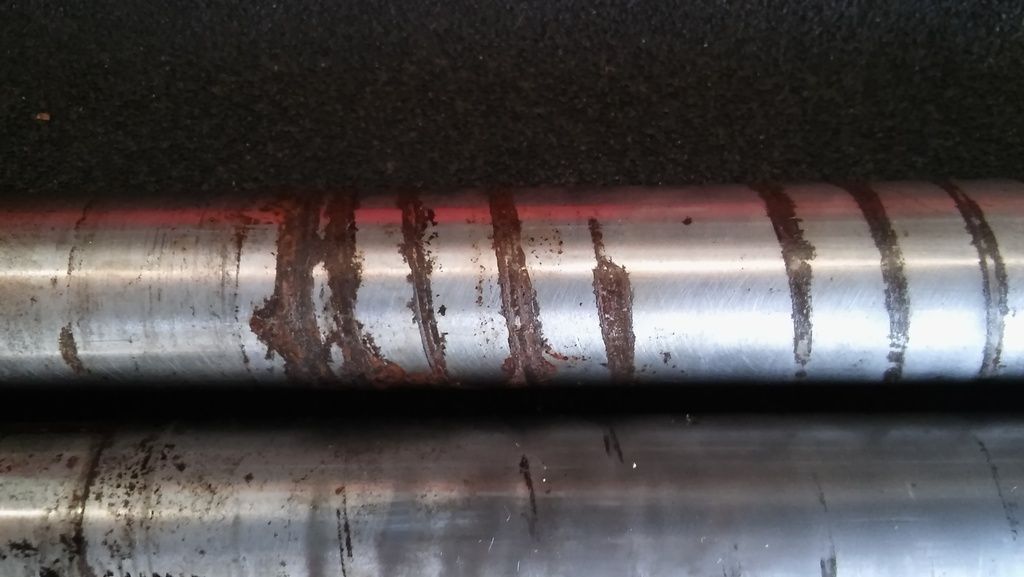
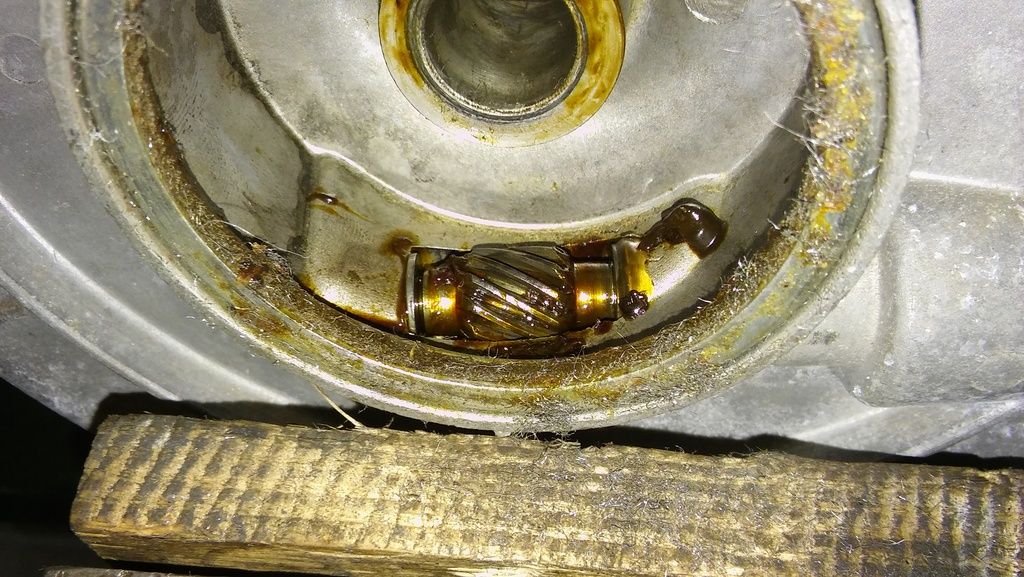
Did find one small surprise. It appears that a previous assembly resulted in some loose valve balls. Here are the results of that.
The balls were all in the valves so the problem must have been corrected. But they did not correct the damage.
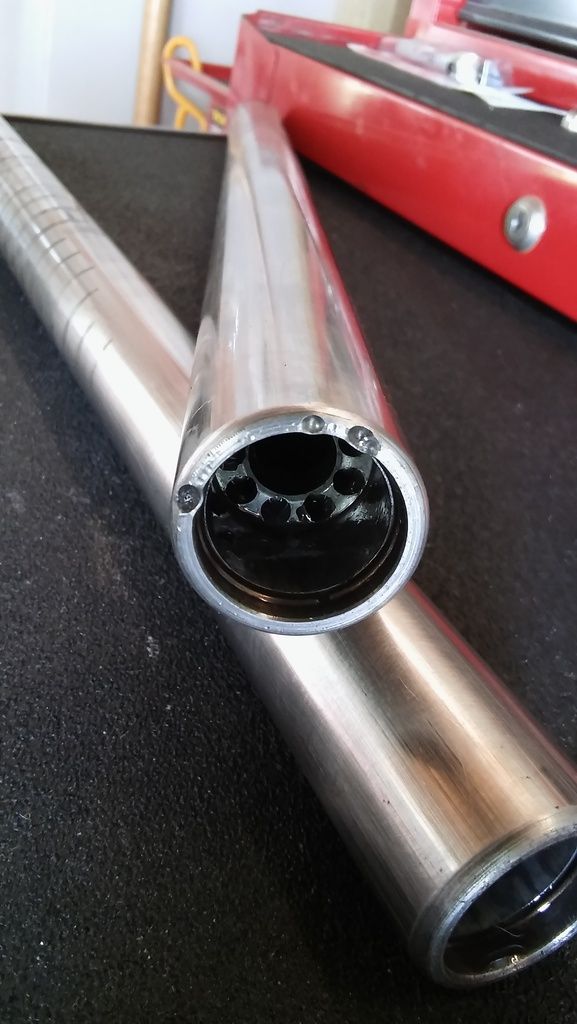
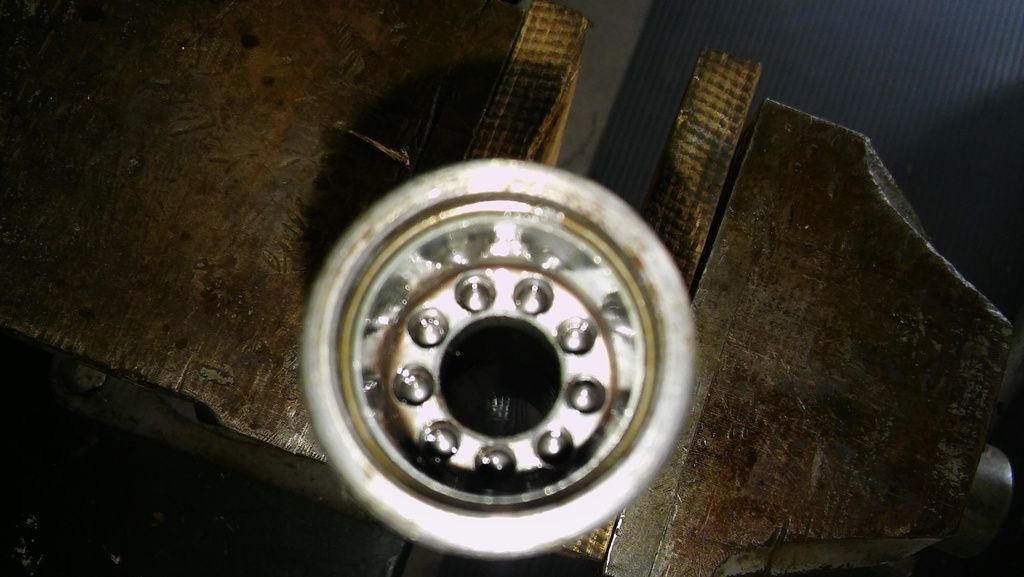
Here is one of the valves in place in the tube. This is what it should look like. You can see the gold snap-ring in the tube which holds the valve in place. You can also see it in the previous photo.
I removed the valves. I had to move the displaced material from the ball indents back to where it came from and a little filing was required as well to get that tube's valve out.
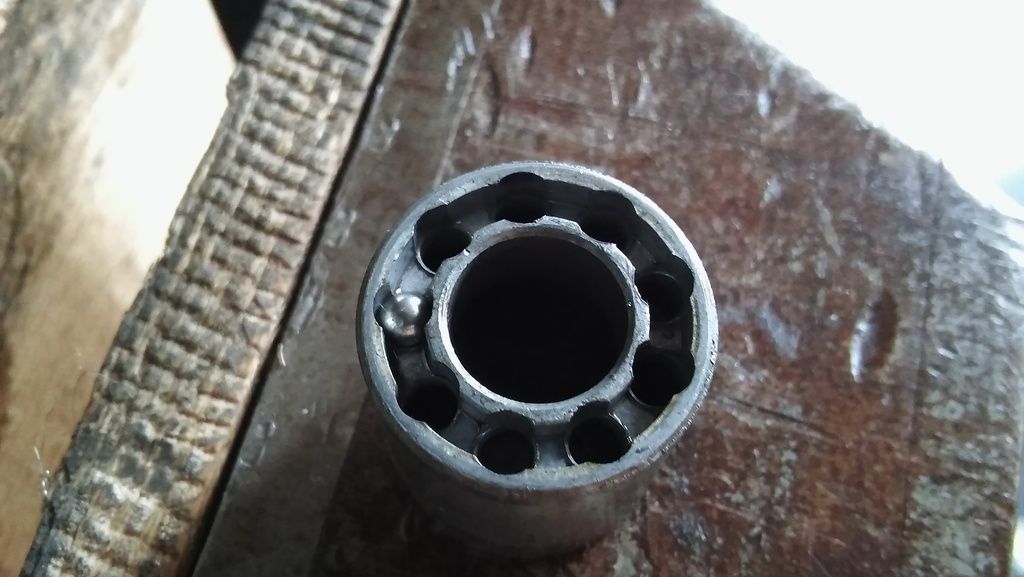
Here is a valve looking at the other (top) end. I have one ball in it to show where they go. A washer goes on top of this to hold the balls in place. Oil flow goes up from the bottom thru the ports that the balls cover. When the oil travels in the opposite direction, the balls close and seal the ports. It is basically a multi-port check valve.
Did not remove the plug in the bottom of the sliders. No need to. Everything cleaned up nicely.
Polished the sliders and they are done. Just need to install new fork seals.
Removed the speedo drive from the front wheel disc. Looks like new.
regards,
Rob
There is no disassembly procedure in the manual. You are supposed to reverse the assembly procedure. When you read it, it makes these forks sound like the most complicated things every put on a bike. So, here is how you take them apart. You remove the allen head bolt in the bottom of the sliders and the tubes slide out. It's that simple. Inside the tubes are the damper rods and springs. The spring drags on the ID of the tube so you have to pull it out with a piece of hooked wire. Piece of cake.
Fork tubes are a bit rusty and have some pitting on them.


I will reassemble them dry and determine the limits of the seal area. Then it is pretty simple to repair with epoxy and then sand them smooth again. Might not be able to do it here as my lathe might not be big enough. Will check tomorrow. Big lathe is home.
Did find one small surprise. It appears that a previous assembly resulted in some loose valve balls. Here are the results of that.

The balls were all in the valves so the problem must have been corrected. But they did not correct the damage.
Here is one of the valves in place in the tube. This is what it should look like. You can see the gold snap-ring in the tube which holds the valve in place. You can also see it in the previous photo.

I removed the valves. I had to move the displaced material from the ball indents back to where it came from and a little filing was required as well to get that tube's valve out.
Here is a valve looking at the other (top) end. I have one ball in it to show where they go. A washer goes on top of this to hold the balls in place. Oil flow goes up from the bottom thru the ports that the balls cover. When the oil travels in the opposite direction, the balls close and seal the ports. It is basically a multi-port check valve.

Did not remove the plug in the bottom of the sliders. No need to. Everything cleaned up nicely.
Polished the sliders and they are done. Just need to install new fork seals.
Removed the speedo drive from the front wheel disc. Looks like new.

regards,
Rob
-
amartina75
- Posts: 347
- Joined: Tue Aug 21, 2012 1:13 am
- Location: Cincinnati, OH. USA
Re: New 250 Project Adventure
There were a few different damper valve designs, one with all holes open and loose balls in place, one with a few balls staked in place to block oil flow and one with holes not driller out at all.
I guess they were searching for the right combination
The design with the balls staked in place was bad the balls come out and get bashed into the fork tubes like yours. Mine were the same way.
I recently made a couple sets of dampers for some forks I need to rebuild
I guess they were searching for the right combination
The design with the balls staked in place was bad the balls come out and get bashed into the fork tubes like yours. Mine were the same way.
I recently made a couple sets of dampers for some forks I need to rebuild
You do not have the required permissions to view the files attached to this post.
1966 250 Scrambler
1970 450 Jupiter
1970 450 Jupiter
-
Snakeoil
- Posts: 109
- Joined: Fri Jun 17, 2016 12:10 pm
- Location: Upstate NY
Re: New 250 Project Adventure
Just thinking about this, the dimples prevented the valve from coming out. So if it was assembled wrong and then corrected, or had the other style with the staked in balls and they came loose, I'm struggling with how they got the balls back into their proper position. I have to look closer at that valve body again.
My friend gave me a chassis, tank, two front fenders, a rear fender, a headlight and a horn. Date stamp on the forks is '64. Stripped the chassis today. Right peg has the teeth gone on the peg and mount. Had star washer in there and a thru bolt spanning both footpegs. Center stand is good. Lower tree has integral fork stops. So, will use this tree instead of mine.
I notice that the '64 frame has the two tangs for the air pump. Yet my frame does not have these. Was there no air pump on early models?
regars,
Rob
-
double diamond
- Posts: 557
- Joined: Thu Apr 28, 2011 1:20 am
Re: New 250 Project Adventure
Narrow case Bevel singles had air pumps ever since the first 175's.
Matt
Matt
-
Snakeoil
- Posts: 109
- Joined: Fri Jun 17, 2016 12:10 pm
- Location: Upstate NY
Re: New 250 Project Adventure
Thanks Matt. I was hoping you were going to say that GT or Mark models intended for racing did not have them.
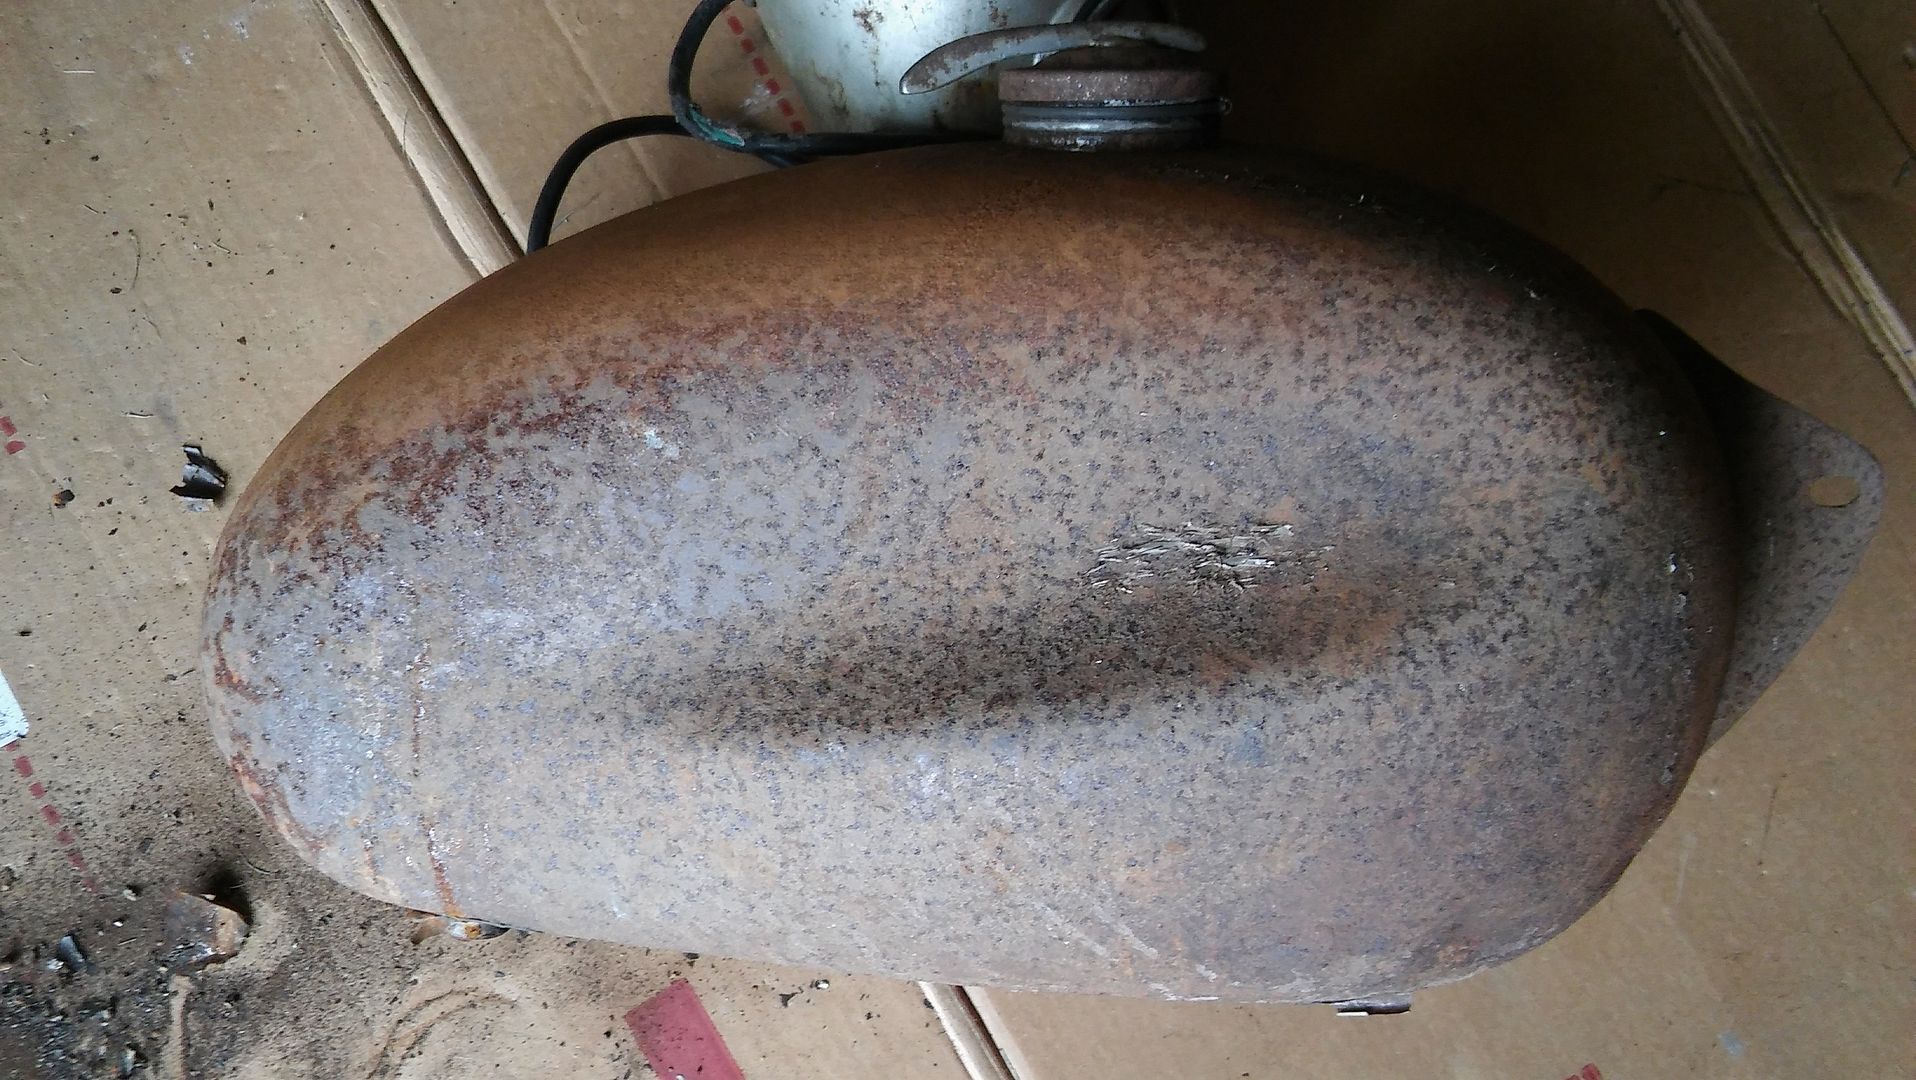
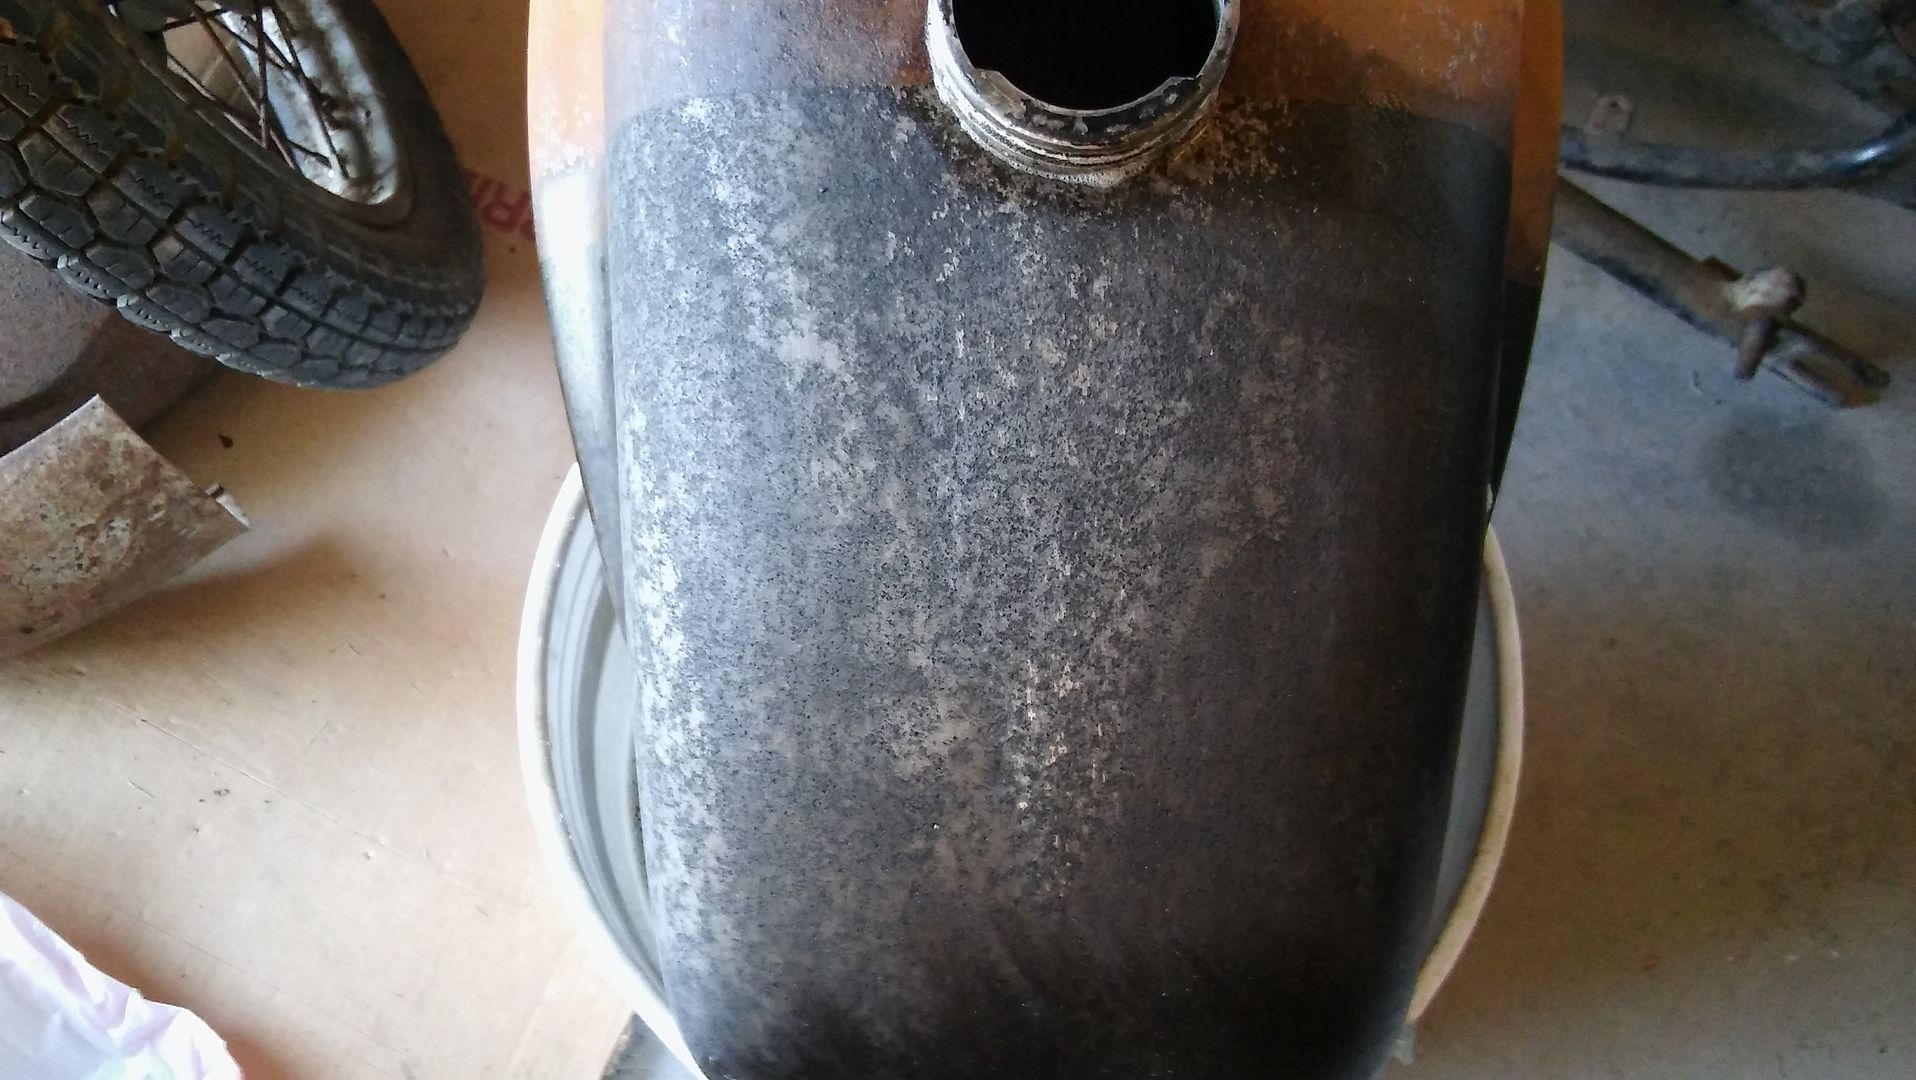
I got a 64 Monza tank with the 64 chassis from Lance. He said it was perfect when he put it in that old milk truck. Not so perfect anymore. Pretty rusty. But it appears solid as a rock. And when I popped the cap open, the interior was in excellent shape. So, I'm going to try to bring it back to life. I have it in a 5 gal pail with 4 gal of Evaporust. It is doing about 2/3 of the tank, inside and out. Will flip it over in a day or so to do the other end. Will probably take the better part of a week to get it completely rust free.
Here are what will be the "before" pictures.
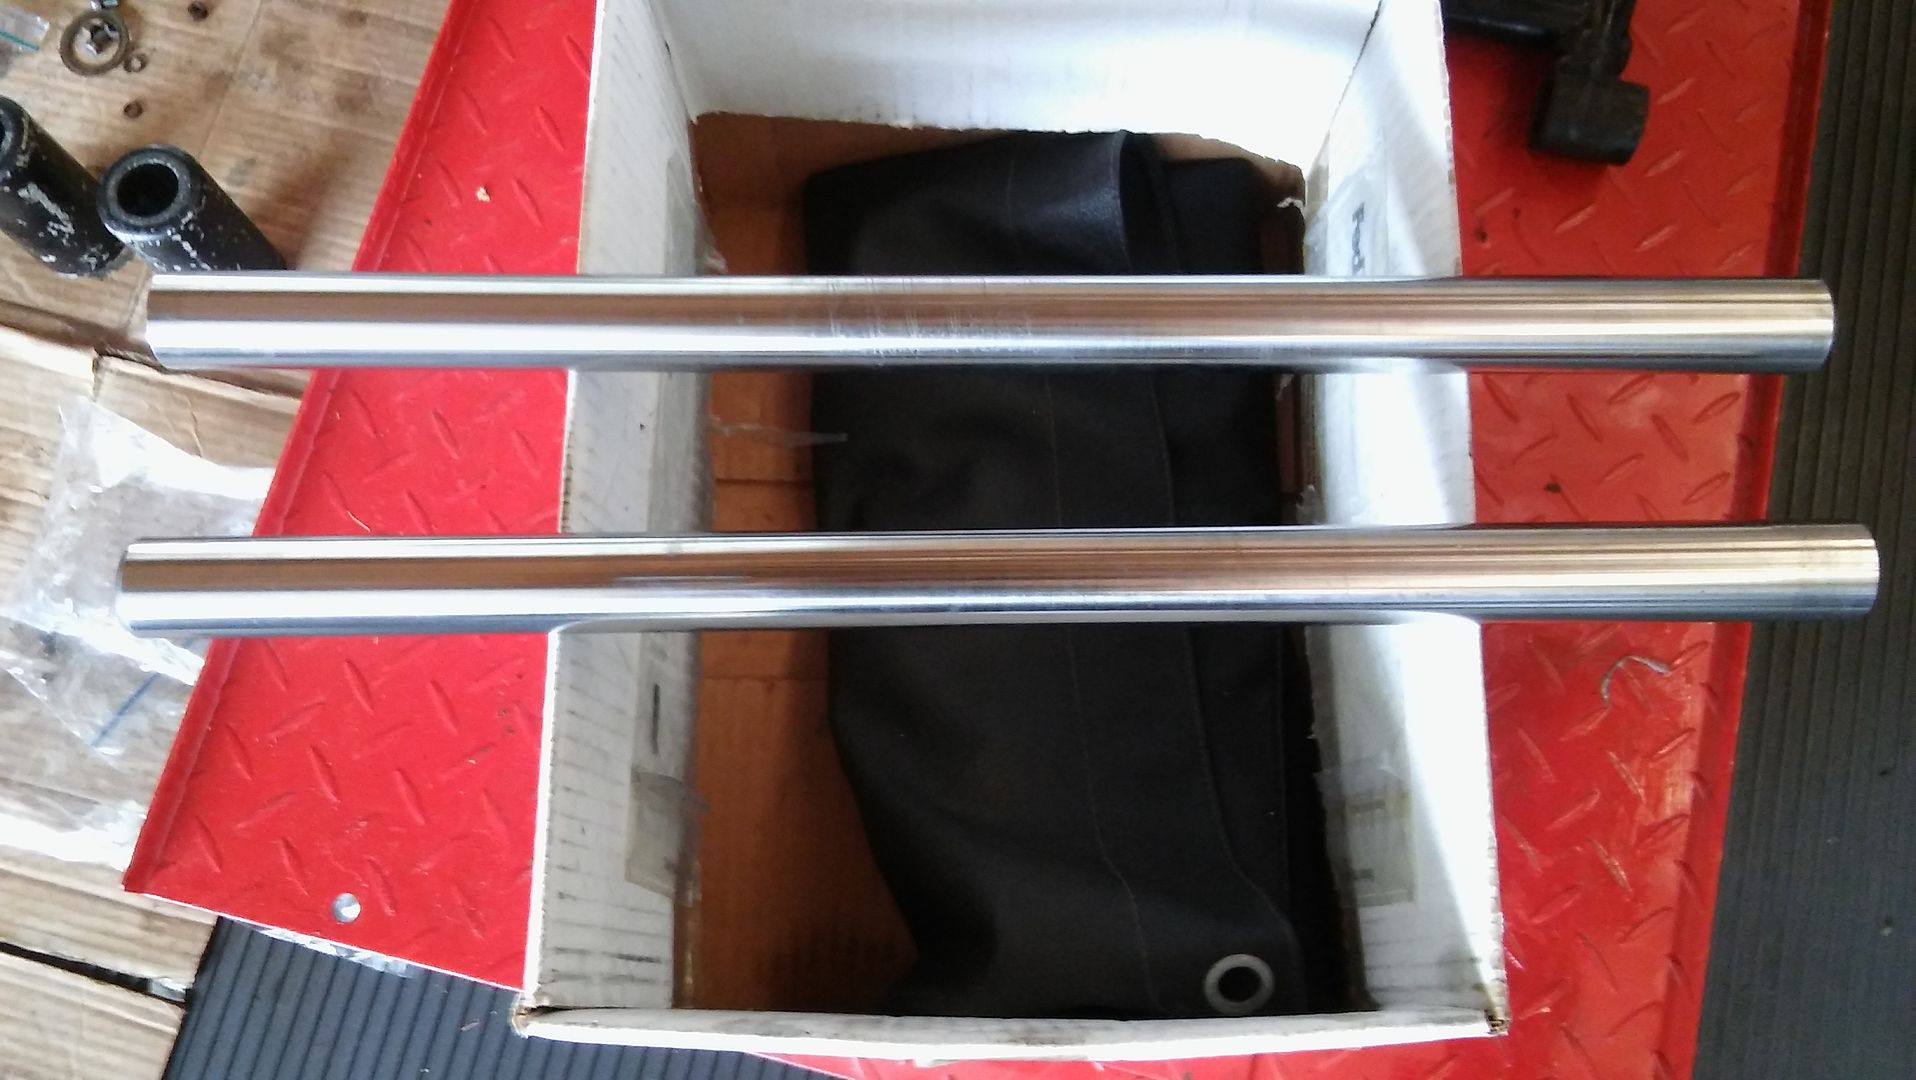
I disassembled and cleaned the forks from Lance's chassis the other day. Inspection revealed both tubes are dead straight and in much better shape than the '66 forks I took apart a week or so ago. If I did not mention it, both tubes are slightly bent the '66 set. Fixable, but still bent.
I measured the seal area by assembling one fork and finding the max stroke without a spring. For those who might be interested, the seal area starts 4.5 inches from the end of the valve end and extends to 9 inches from the valve end. So, a 4.5 inch max stroke.
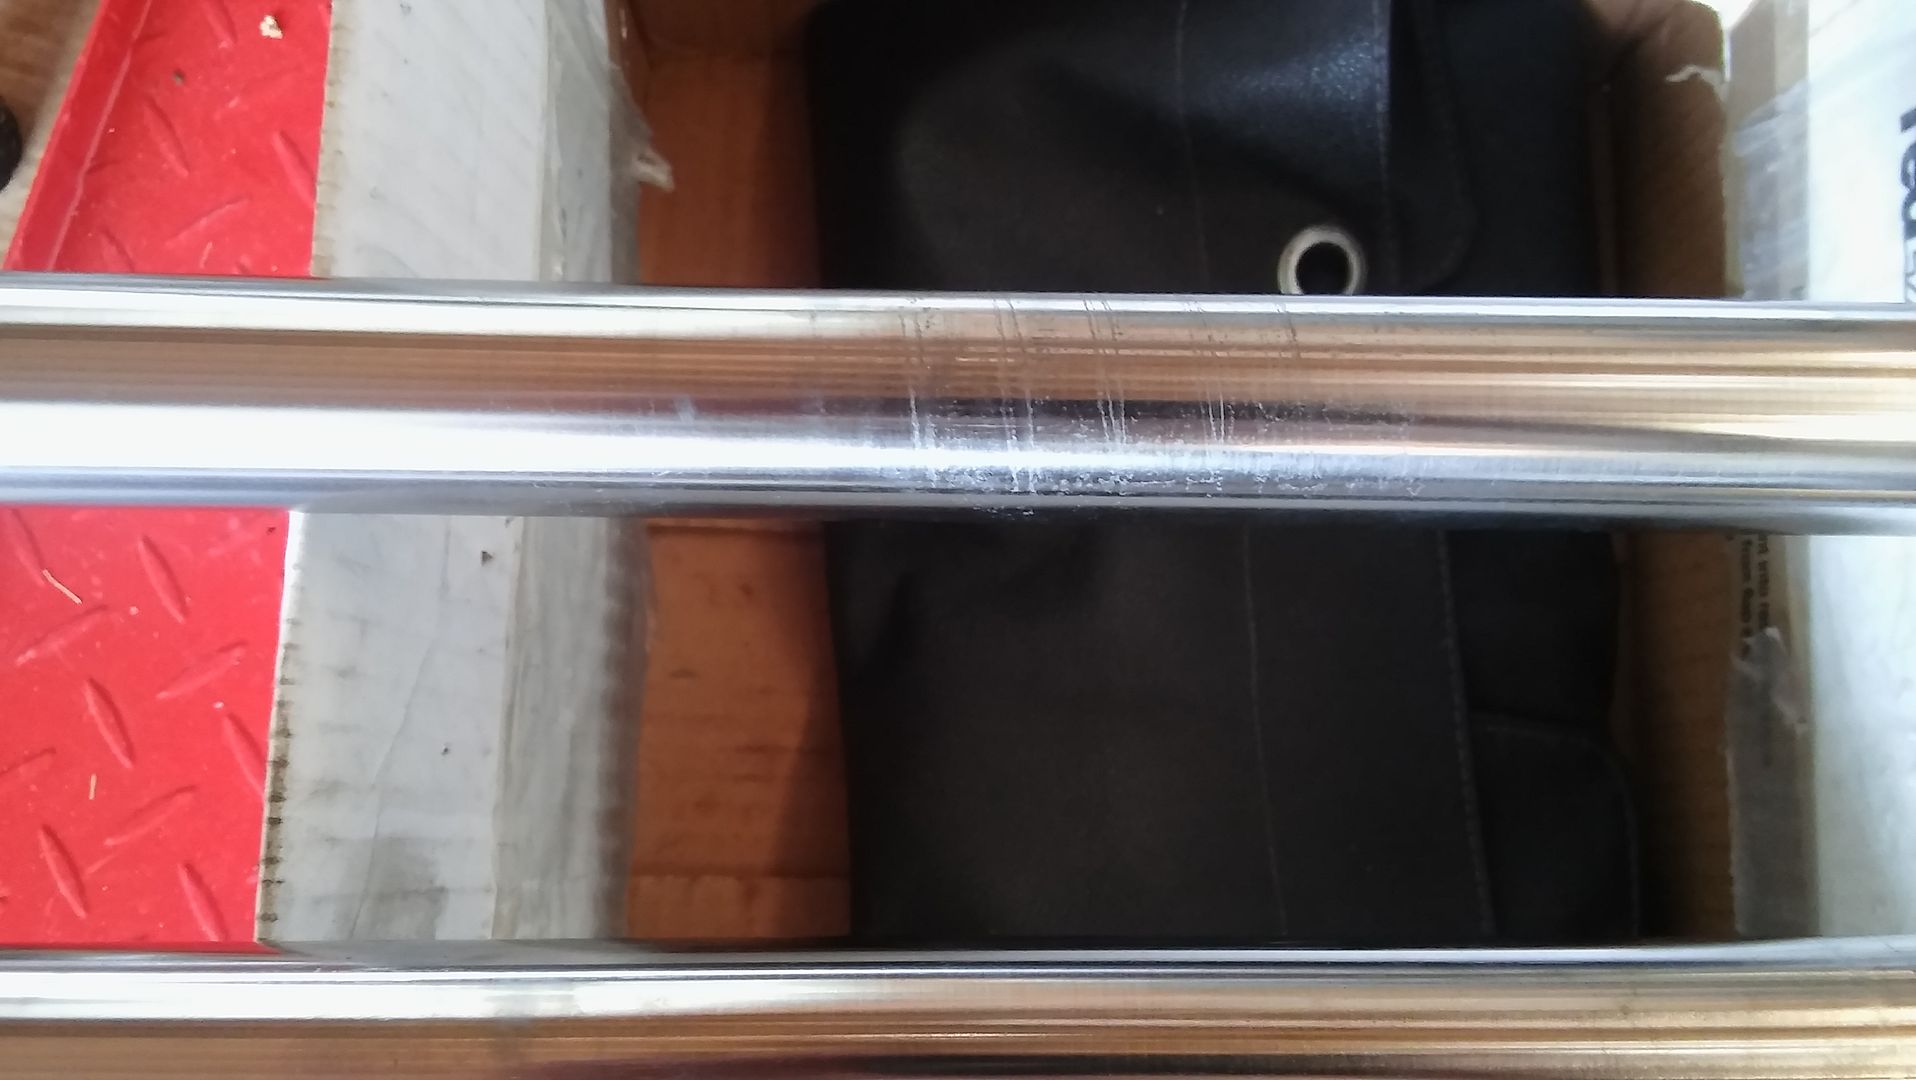
I put these new tubes in my small lathe and polished them with 220 grit wet/dry. There was a little pitting, really more like surface blemishes on one tube in the seal area. The other is scored a bit in that area. But after a good polishing, I think they will work just fine. I might see if I can fill the few score marks with JB Weld and repolish them. But I'm doubtful that the scoring will result in any leaking. Maybe a bit shorter seal life.
Here are the forks after the initial polish.
s
Here is that blemish area which was greatly reduced with some more polishing. You cannot feel it with your fingers. So well under 0.001".
regards,
Rob
I got a 64 Monza tank with the 64 chassis from Lance. He said it was perfect when he put it in that old milk truck. Not so perfect anymore. Pretty rusty. But it appears solid as a rock. And when I popped the cap open, the interior was in excellent shape. So, I'm going to try to bring it back to life. I have it in a 5 gal pail with 4 gal of Evaporust. It is doing about 2/3 of the tank, inside and out. Will flip it over in a day or so to do the other end. Will probably take the better part of a week to get it completely rust free.
Here are what will be the "before" pictures.


I disassembled and cleaned the forks from Lance's chassis the other day. Inspection revealed both tubes are dead straight and in much better shape than the '66 forks I took apart a week or so ago. If I did not mention it, both tubes are slightly bent the '66 set. Fixable, but still bent.
I measured the seal area by assembling one fork and finding the max stroke without a spring. For those who might be interested, the seal area starts 4.5 inches from the end of the valve end and extends to 9 inches from the valve end. So, a 4.5 inch max stroke.
I put these new tubes in my small lathe and polished them with 220 grit wet/dry. There was a little pitting, really more like surface blemishes on one tube in the seal area. The other is scored a bit in that area. But after a good polishing, I think they will work just fine. I might see if I can fill the few score marks with JB Weld and repolish them. But I'm doubtful that the scoring will result in any leaking. Maybe a bit shorter seal life.
Here are the forks after the initial polish.

s
Here is that blemish area which was greatly reduced with some more polishing. You cannot feel it with your fingers. So well under 0.001".

regards,
Rob
-
Snakeoil
- Posts: 109
- Joined: Fri Jun 17, 2016 12:10 pm
- Location: Upstate NY
Re: New 250 Project Adventure
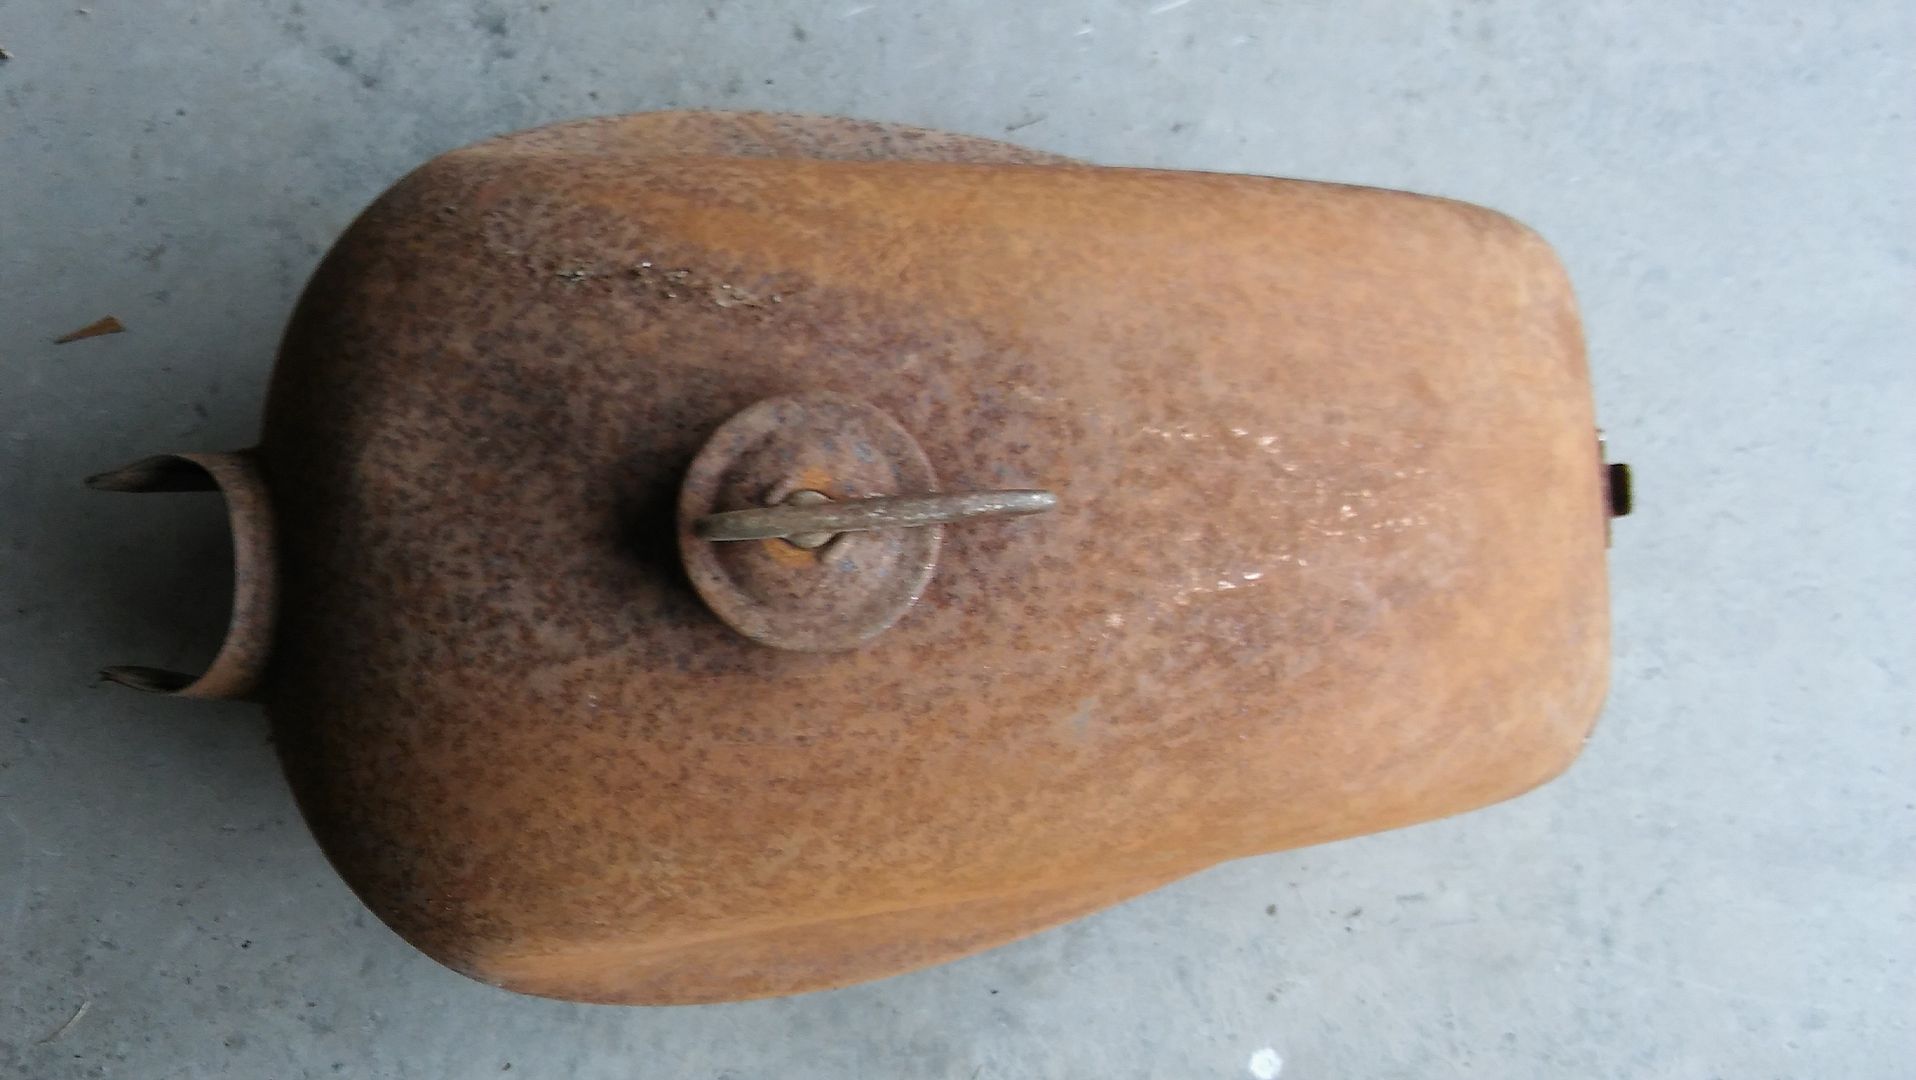
Pulled the tank out of the Evaporust this afternoon to check progress. Wiped the smut off the surface and it is looking pretty good. No shortage of pitting, however.
Here's the tank with an area of smut wiped off. Guess it was more like 1/2 that was getting derusted, rather than 2/3.

Here is the back side. You can see some vestige of chrome. The pattern a solid V shape. All the Monza tank pictures I've seen show chrome scallops that are individual on each side and run down the sides toward the back. Does this particular V-pattern help date the tank?
regards,
Rob
Here's the tank with an area of smut wiped off. Guess it was more like 1/2 that was getting derusted, rather than 2/3.

Here is the back side. You can see some vestige of chrome. The pattern a solid V shape. All the Monza tank pictures I've seen show chrome scallops that are individual on each side and run down the sides toward the back. Does this particular V-pattern help date the tank?

regards,
Rob
-
CaptonZap
- Posts: 27
- Joined: Sun Jan 17, 2016 3:04 pm
Re: New 250 Project Adventure
I don't know if there are any platers in your neighborhood, but you might go ask them if they use two different copper baths. If they do, they can use the cyanide bath as the strike, and then fill the pits with acid copper, which builds/fills better. Then they polish the copper, and the pits are gone.
I have a '57 BSA tank with pits like yours, and it came back looking like new.
Quality Plating in Yuma, CO | 199 W 9th Ave, Yuma, CO
Bing him, and get his phone number, and explain what you have. His name is Lowell.
He's not quick, but is worth the wait, in my book.
CZ
I have a '57 BSA tank with pits like yours, and it came back looking like new.
Quality Plating in Yuma, CO | 199 W 9th Ave, Yuma, CO
Bing him, and get his phone number, and explain what you have. His name is Lowell.
He's not quick, but is worth the wait, in my book.
CZ
Return to “Ducati Singles Main Discussions (& How to Join)”
Who is online
Users browsing this forum: No registered users and 166 guests