I guess I'll need to read the owner's manual I downloaded for the 160. That's pretty funny stuff. Getting folks to change the oil on a small bike is a hit an miss proposition at best. Tearing down the engine every 10K miles is pure fantasy.
BMW's made previous to the/5 series (/2 and earlier) used oil slingers to feed the big ends and those slingers also became cetrifuges which would pack with crud. I forget the recommended interval, but tearing the engine down and cleaning the slingers was recommended maintenance. Anytime you buy one of those, you should alway plan on having to do that work unless you know the seller well. They all say that the slingers were cleaned and the splines were lubed. Yeah...right.
I need to spend some time with the service manual. I have to admit, I'm deliquent in doing that. I only refer to it when I need info. Even though I have used computers since the first IBM PC, I still like to sit down in a chair with a hard copy book and read thru it. I need to get my manual printed.
regards,
Rob
New 250 Project Adventure
Moderator: ajleone
-
Snakeoil
- Posts: 109
- Joined: Fri Jun 17, 2016 12:10 pm
- Location: Upstate NY
-
amartina75
- Posts: 347
- Joined: Tue Aug 21, 2012 1:13 am
- Location: Cincinnati, OH. USA
Re: New 250 Project Adventure
I never realized that service procedure was left out of the 250's owners manual. For whatever reason that was, possibly an unwanted omission from the printer? It was put back for the 350's and 450's widecase bikes. So I guess only the 250 owners didn't clean their sludge traps! 
Supposedly you can clean the trap by only removing the cylinder for access.
I've had the pleasure of cleaning the slingers on a /2
Those early BMW's are a pleasure to work on if you have all the right tools and a copy of "Barrington Motor Works BMW /2 Restoration and Service Manual" possibly the best motorcycle restoration book ever written.
1966 250 Scrambler
1970 450 Jupiter
1970 450 Jupiter
-
Eldert
- Posts: 772
- Joined: Sun Nov 01, 2009 3:23 pm
- Location: Hazerswoude Rijndijk Netherlands
Re: New 250 Project Adventure
Eldert wrote:Hi Rob
the fixed first gear has a small hole in it to lubricate the clutch pushrod that is why the seal is there .
Eldert
i was wrong . only the widecase engines have a lubrication hole in the first gear .
Eldert
-
Snakeoil
- Posts: 109
- Joined: Fri Jun 17, 2016 12:10 pm
- Location: Upstate NY
Re: New 250 Project Adventure
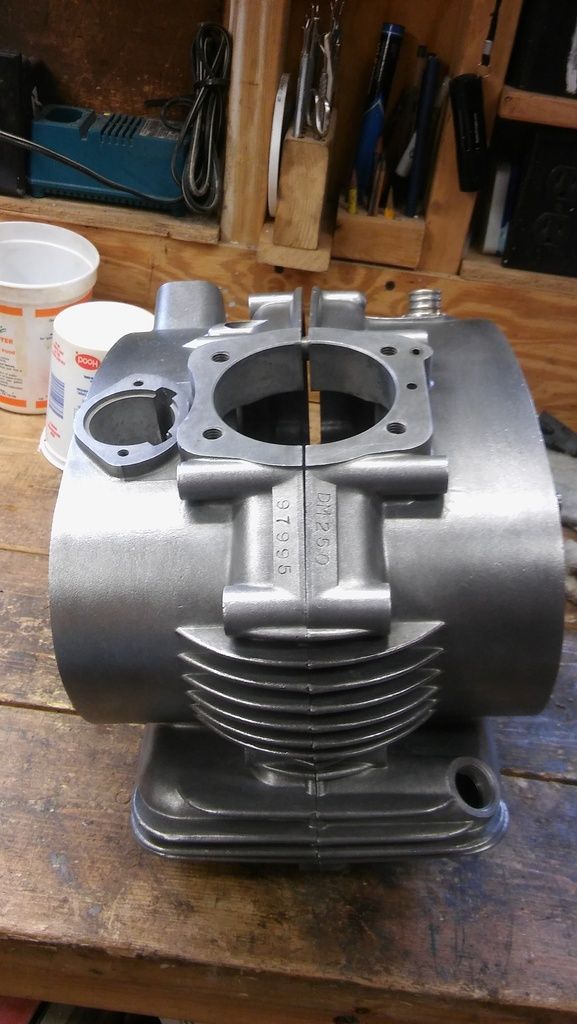
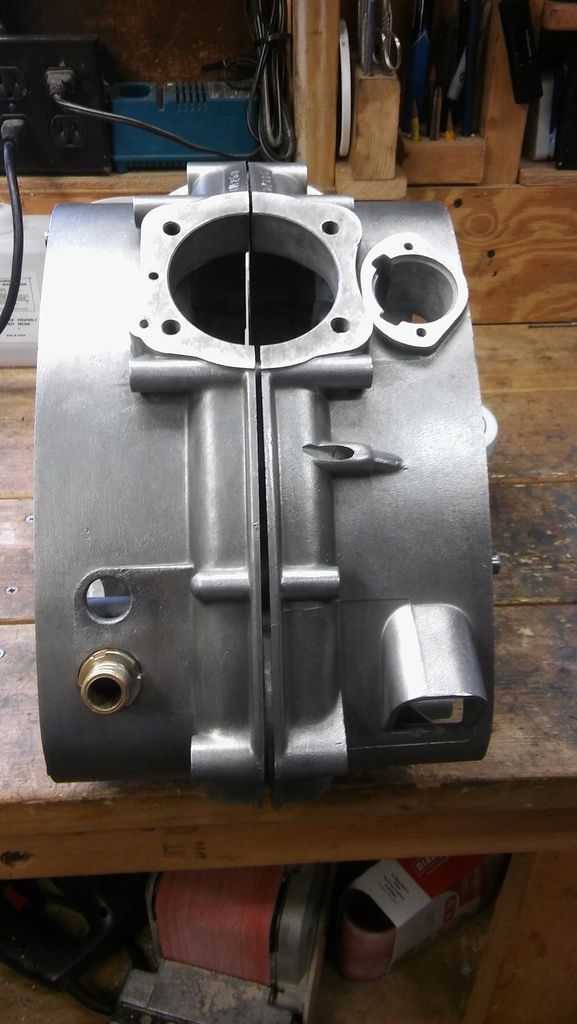
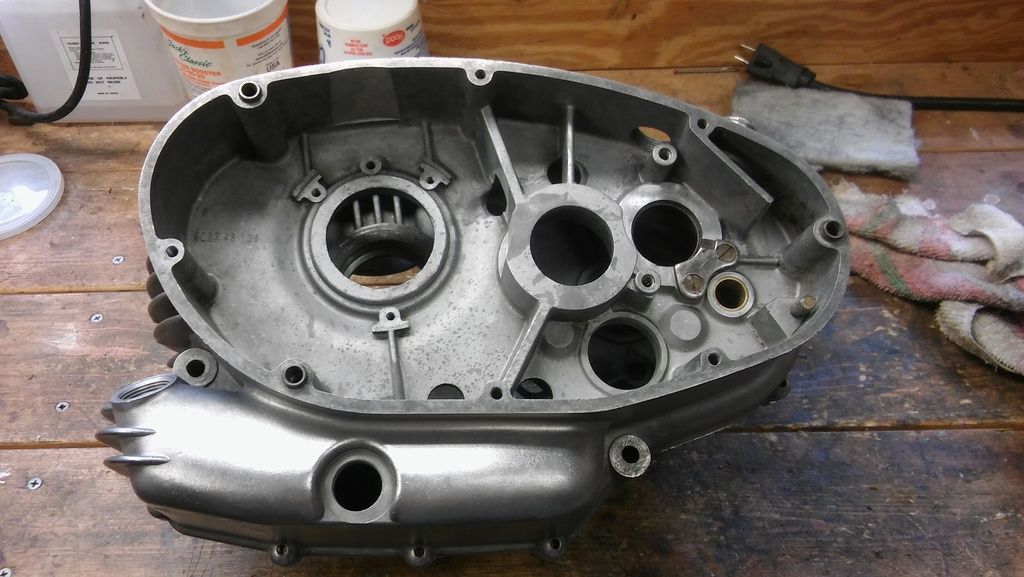
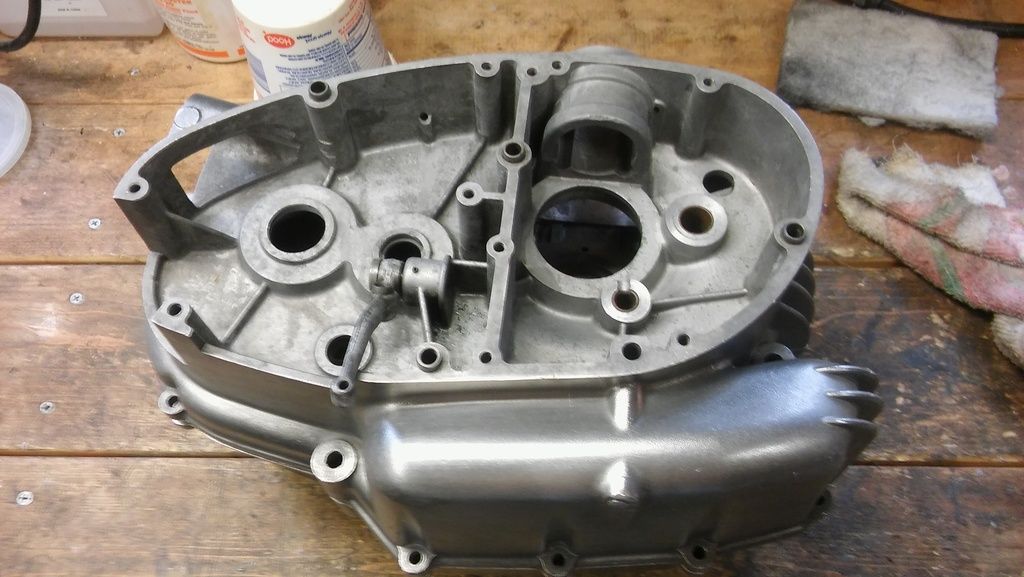
Today was pure grunt work. Decided to clean the cases. Goal was to avoid any blasting to remove stains. I very happy with the results.
Process was multi-step, some of which were experiments to see if they alone would do the trick.
First was a good scrubbing in scalding hot water and Dawn. Using the same water, I tried both Bon Ami and Comet cleansers and stiff plastic brushes. Cleaned them up nicely, but did nothing for the stains.
Move to phosphoric acid. This is the primary ingredient in Aluminum Jelly. The acid needed a significant residence time to work on the stains. But I could see them slowing disappearing as I scrubbed with a paint brush. I ended up doing both cases twice with the phos acid. Pressure washed them between acid washes.
Rinsed the cases and dried them in the sun. Then went after them with Mother's Aluminum polish and some stiff plastic bristle brushes. This did a great job of cleaning out any remaining stains or corrosion. Buffed them with a dry rag but being a case surface, it was not easy to get all the dark gray residue off. So, I pressure washed them and then dried them with a rag.
Last step was to brush the entire exteral surface with a stainless steel toothbrush. I've used this technique in the past to spruce up the cast aluminum surfaces on assembled engines. This gave the cases a nice dull luster. Once completely brushed, I buffed them again with a clean dry towel. I'm happy with the way they came out.
And yes I know that the vent tube fitting needs to come out. My castle nut sockets are all at home. I need to remove that fitting so I can replate it.
Here are the final results.
regards,
Rob
Process was multi-step, some of which were experiments to see if they alone would do the trick.
First was a good scrubbing in scalding hot water and Dawn. Using the same water, I tried both Bon Ami and Comet cleansers and stiff plastic brushes. Cleaned them up nicely, but did nothing for the stains.
Move to phosphoric acid. This is the primary ingredient in Aluminum Jelly. The acid needed a significant residence time to work on the stains. But I could see them slowing disappearing as I scrubbed with a paint brush. I ended up doing both cases twice with the phos acid. Pressure washed them between acid washes.
Rinsed the cases and dried them in the sun. Then went after them with Mother's Aluminum polish and some stiff plastic bristle brushes. This did a great job of cleaning out any remaining stains or corrosion. Buffed them with a dry rag but being a case surface, it was not easy to get all the dark gray residue off. So, I pressure washed them and then dried them with a rag.
Last step was to brush the entire exteral surface with a stainless steel toothbrush. I've used this technique in the past to spruce up the cast aluminum surfaces on assembled engines. This gave the cases a nice dull luster. Once completely brushed, I buffed them again with a clean dry towel. I'm happy with the way they came out.
And yes I know that the vent tube fitting needs to come out. My castle nut sockets are all at home. I need to remove that fitting so I can replate it.
Here are the final results.


regards,
Rob
-
Ventodue
- Posts: 955
- Joined: Mon Mar 08, 2010 3:23 pm
- Location: Montpellier, France
Re: New 250 Project Adventure
Snakeoil wrote: That's pretty funny stuff. Getting folks to change the oil on a small bike is a hit an miss proposition at best. Tearing down the engine every 10K miles is pure fantasy.
I suspect that, as much as anything, it reveals the racing origin of the engine. And anyways, Ign Taglioni would have thought it quite normal that you stripped the engine at regular intervals - normally during the week, after work, ready for the race the next week-end
-
Jordan
- Posts: 1394
- Joined: Fri Dec 24, 2010 11:29 am
Re: New 250 Project Adventure
Regarding the Ducati sludge traps, has anyone ever experienced oil starvation at the big end, and damage because of that?
That is, if the trap became full of debris to the point that oil could not flow.
I used to think that the trap, if full, would effectively bypass the oil. So, it would be just as if there were no sludge trap at all, and no centrifugal filtering. That is, just like a lot of old motorcycle engines used to be made, like my old AJS for example. And if so, not of great concern.
I'm not 100 per cent certain that the Ducati would not block off, or at least restrict the oil flow if the trap became choked with debris. But, I've never heard of a case of big end seizure caused by that situation.
I'm not inclined to disturb my sludge trap to clean it, except at a major overhaul. The bike gets oil changed long before it looks dirty.
-
Snakeoil
- Posts: 109
- Joined: Fri Jun 17, 2016 12:10 pm
- Location: Upstate NY
Re: New 250 Project Adventure
Complete plugging of the trap has no impact on oil flow to the big end.
Rob
Rob
-
double diamond
- Posts: 557
- Joined: Thu Apr 28, 2011 1:20 am
Re: New 250 Project Adventure
Rob,
The radial port you observed on the left side of your crankshaft lines up with a groove in the bore of the primary gear. There are three holes drilled through the primary gear to this groove in order to lubricate the primary gear and the gear machined on the clutch hub.
The crank pin can also develop deposits from centrifugal oil filtration. If you discovered deposits behind the left side oil plug, some material is getting past the centrifugal filter in the flywheel. May want to remove the two welch plugs on each end of the big end pin and check that the bore in the pin is clean. Hopefully your ex-Ducati dealer has the welch plugs.
Matt
-
Snakeoil
- Posts: 109
- Joined: Fri Jun 17, 2016 12:10 pm
- Location: Upstate NY
Re: New 250 Project Adventure
I thought about removing the welch plugs. But I am pretty content that I flush any crud that might have been in there out. But I have time so I might just wake up screaming in the middle of the night and decide to pull those plugs.
I can machine new welch plugs so, that's not an issue.
Meanwhile, back at the ranch...
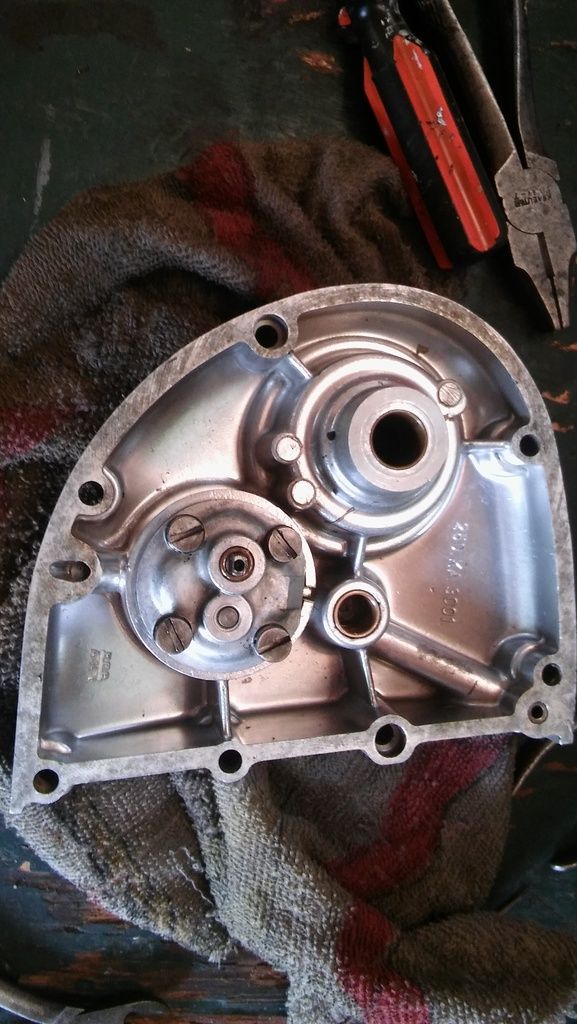
Went into the oil pump. A little wear on the drive gear. Nil on the driven gear. Here are some pics of the pump.
Here's the pump with the safety wire removed. Wire was very strange. Looked more like a long lathe chip. Never saw this before. Perhaps the Italians make safety wire on a pasta machine. Looked like tiny spirolina.
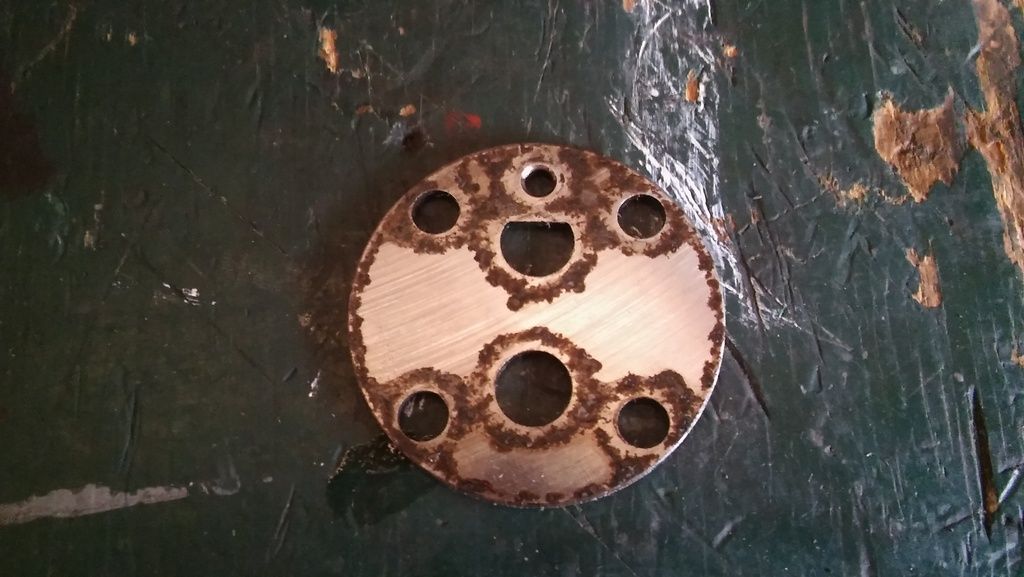
Cover off and gears exposed. You can see a little wear in the face of the drive gear.
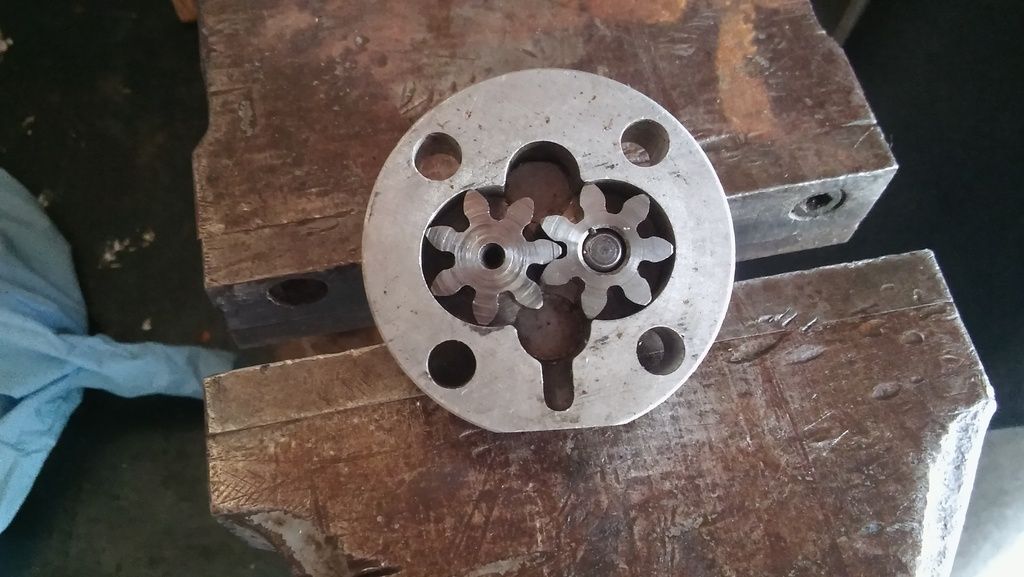
With gears removed, you can see some scoring in the drive gear chamber. Pump will lose a little efficiency due to this.
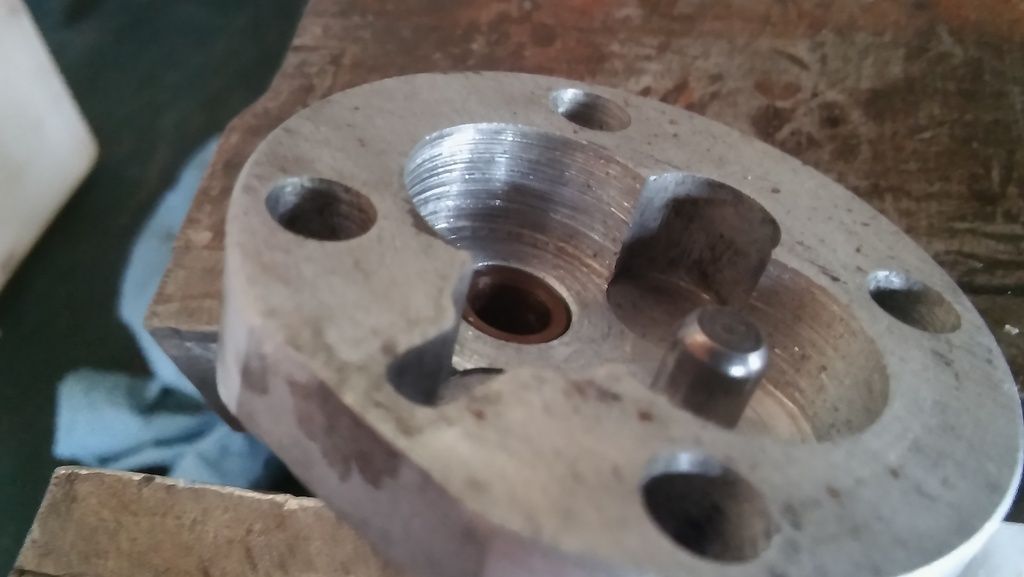
Going deeper, face plate also shows some scoring for the drive gear area. Driven gear area is excellent, considering.
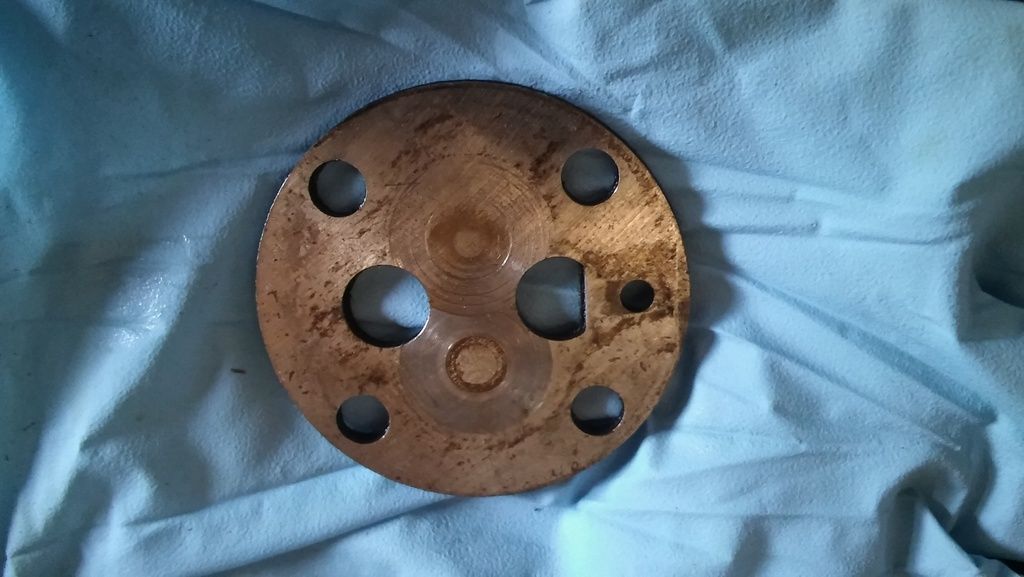
Back side of the faceplate show corrosion where the gasket was compressed. Not surprised. Condensation had to accumulate somewhere.
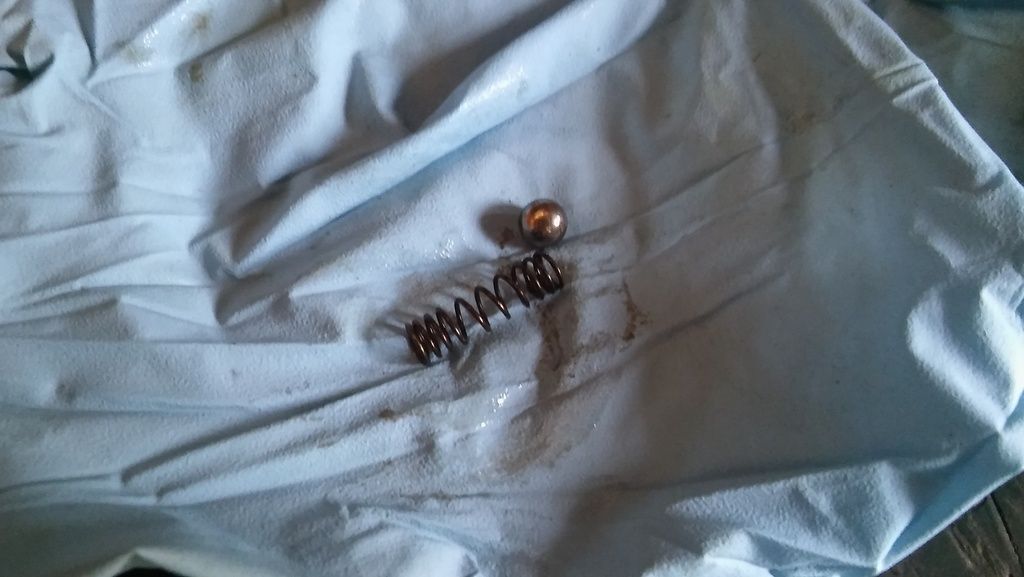
Relief ball and spring were fine.
And lastly, the pump body was fine.
Hit the faceplate on some 400 wet/dry on my granite plate, cleaned up any burrs on the gears from wear, blew everthing off with compressed air and fit all the parts together dry to assure no issues.
A little oil on the various parts (will pump it full during reassembly) and put it back together. Last step was to properly safety-wire the cover screws. This aircraft grade stainless safety wire.
I can machine new welch plugs so, that's not an issue.
Meanwhile, back at the ranch...
Went into the oil pump. A little wear on the drive gear. Nil on the driven gear. Here are some pics of the pump.
Here's the pump with the safety wire removed. Wire was very strange. Looked more like a long lathe chip. Never saw this before. Perhaps the Italians make safety wire on a pasta machine. Looked like tiny spirolina.

Cover off and gears exposed. You can see a little wear in the face of the drive gear.

With gears removed, you can see some scoring in the drive gear chamber. Pump will lose a little efficiency due to this.

Going deeper, face plate also shows some scoring for the drive gear area. Driven gear area is excellent, considering.

Back side of the faceplate show corrosion where the gasket was compressed. Not surprised. Condensation had to accumulate somewhere.

Relief ball and spring were fine.

And lastly, the pump body was fine.

Hit the faceplate on some 400 wet/dry on my granite plate, cleaned up any burrs on the gears from wear, blew everthing off with compressed air and fit all the parts together dry to assure no issues.
A little oil on the various parts (will pump it full during reassembly) and put it back together. Last step was to properly safety-wire the cover screws. This aircraft grade stainless safety wire.

-
Snakeoil
- Posts: 109
- Joined: Fri Jun 17, 2016 12:10 pm
- Location: Upstate NY
Re: New 250 Project Adventure
I played with the shift mechanism today. Wanted a dry run on the assembly process before I attempt it with it greased. Suggest anyone who has not done this before try it dry first.
As I worked thru it, I realized that there is a trick that makes it much easier to do. So thought I'd share it.
But first, lets use the trick to make dissembly easy. If you have never done one of these before, this trick should make it easier and allow you to observe how the pieces come apart.
First, you need a set of robust wood or aluminum jaws in your vise. I have wood.
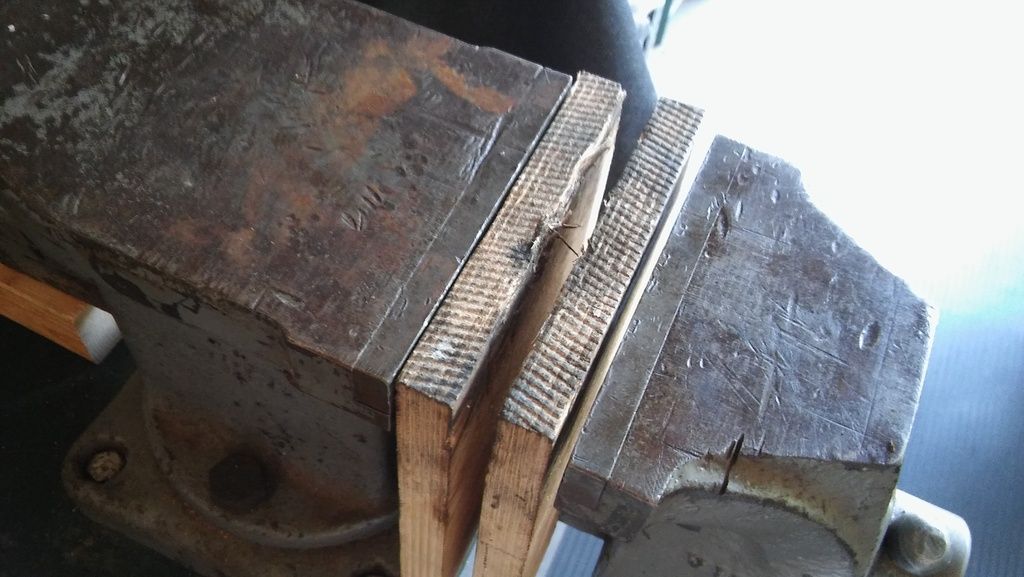
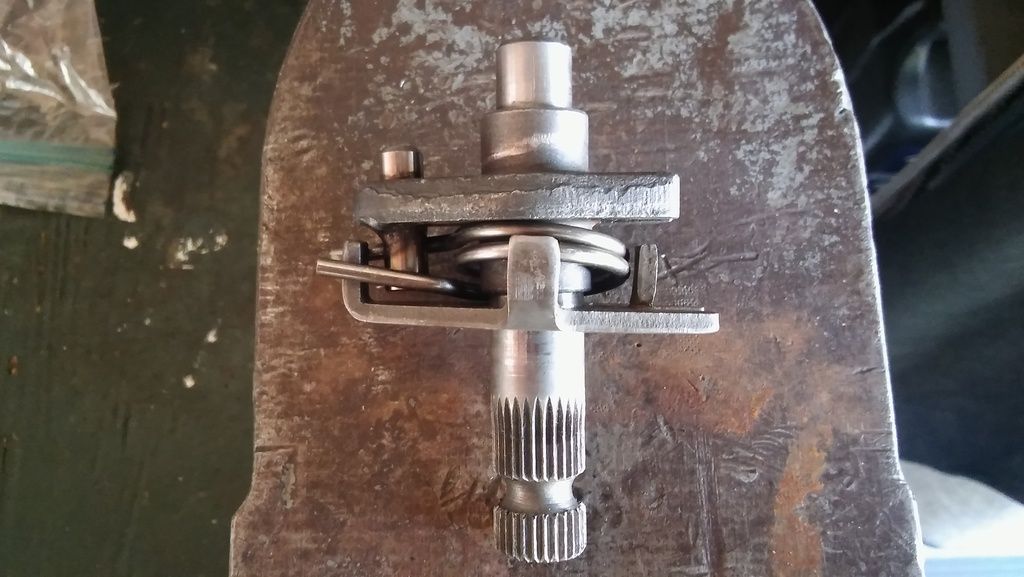
Now, with the shift pedal removed, place the splined shaft in the vise jaws so that the eccentric nut and washer clear the jaws. Here is a shot showing that.
Now make sure the case is down tight on the jaws and tighten the vise.
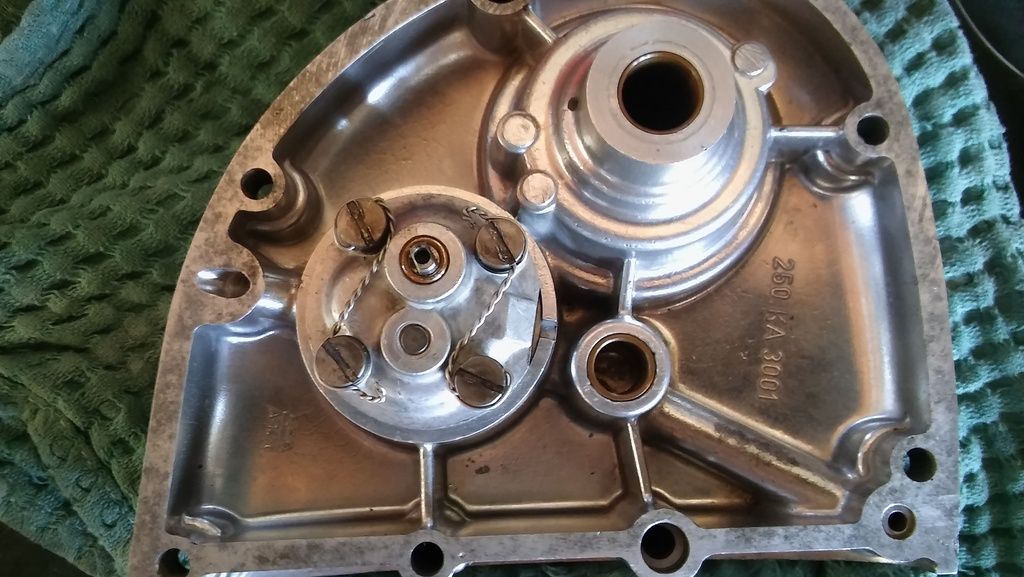
With that done, you remove the three cover screws and tap on the cover to remove it. It should come off with little effort.
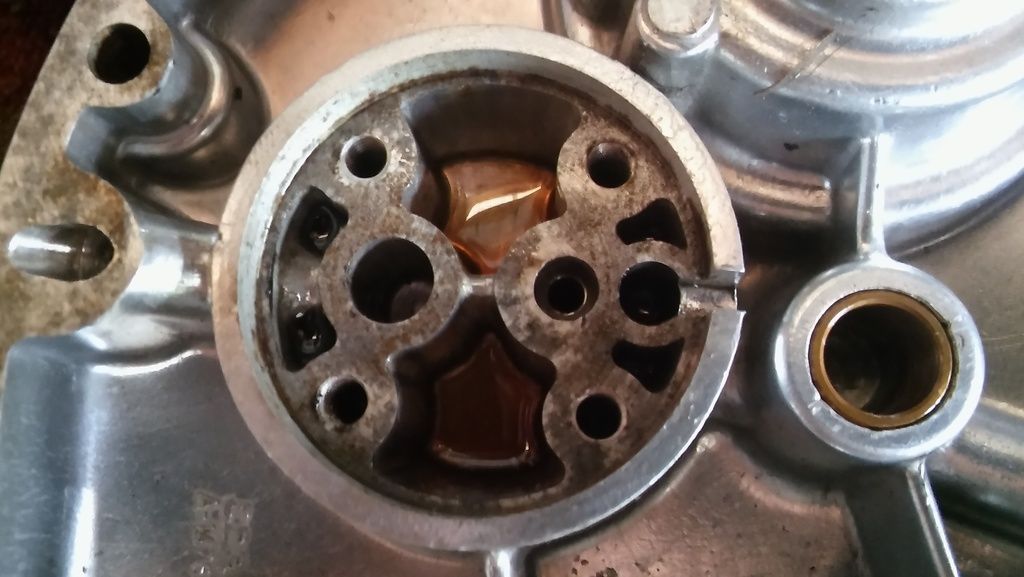
With the cover off, this is what you will find.
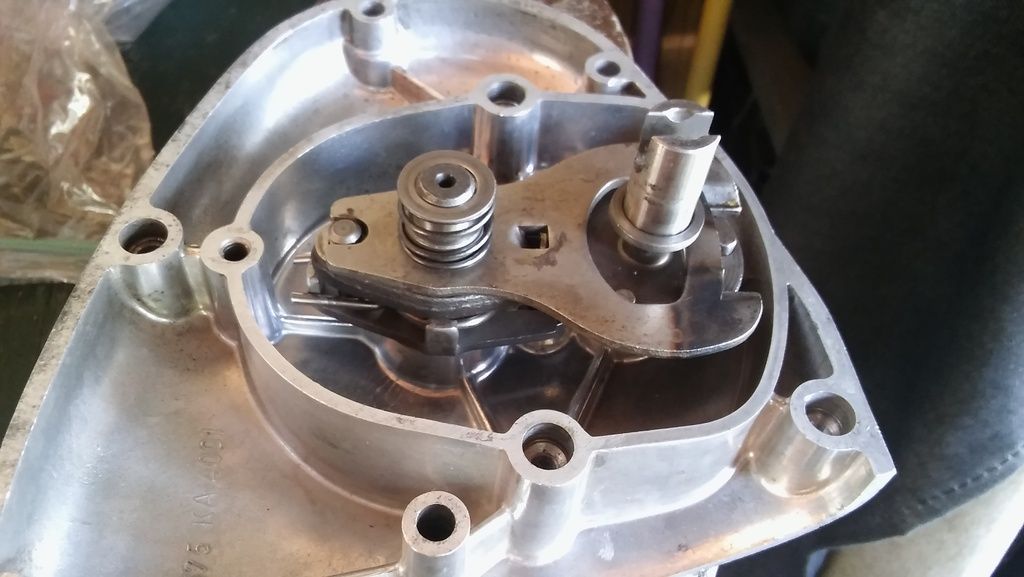
Now you can remove the following pieces.
Fork pusher spring
Selector control fork
Gear selector
Any shims/washers
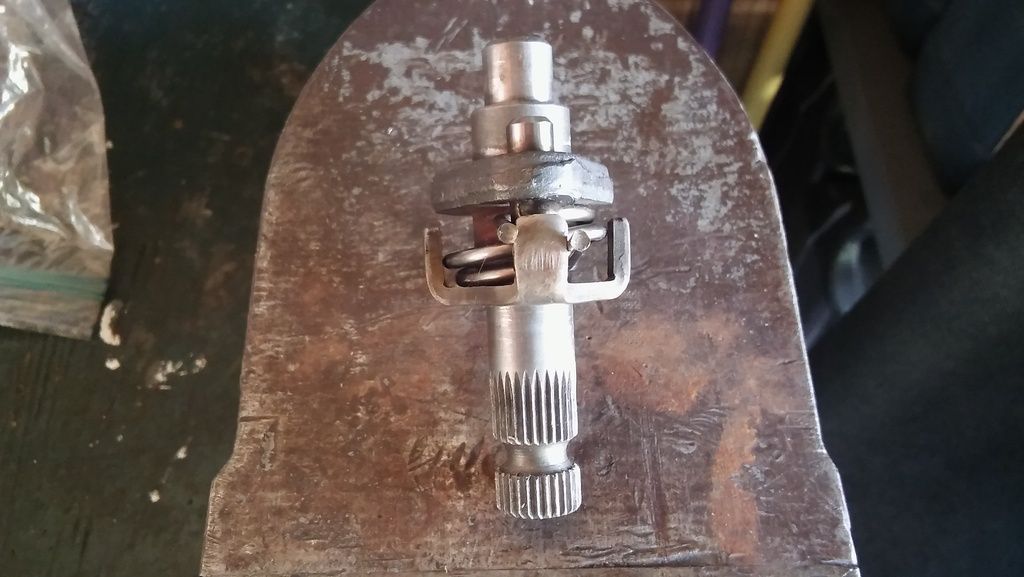
With those parts removed, this is what you will have remaining
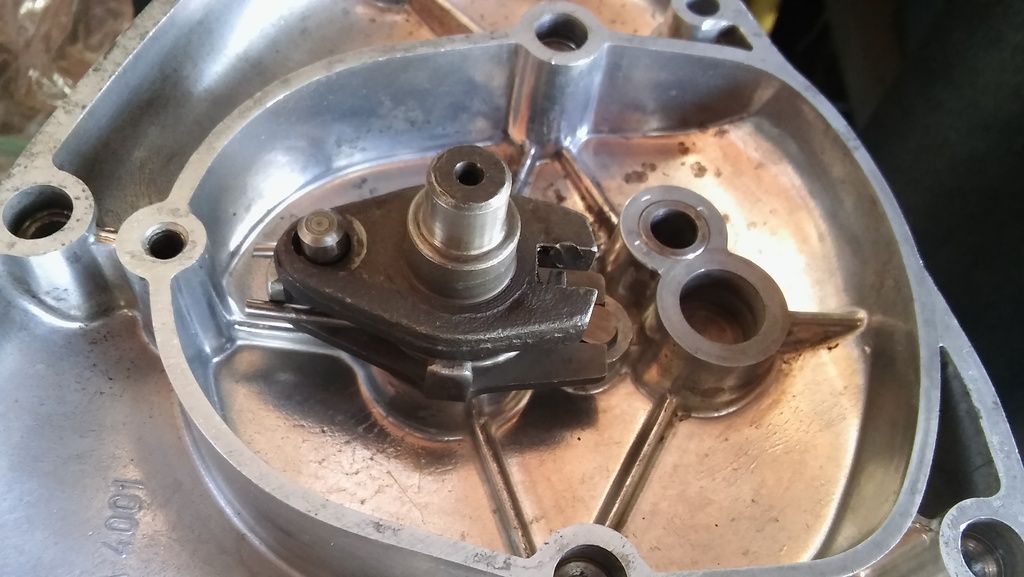
You can lift out that assembly as one piece once you loosen the vise jaws.
Here it is still assembled. Note the position of the spring ends relative to the ear on the adjusting plate. The spring will pop off with a little persuasion and the pieces will come apart.
Assembly is the reverse order.
First, you need to install the eccentric piece with nut and washer if you have removed it. Then assemble the splined shifter shaft, adjusting plate and releasing spring into the side cover. Using the cover to hold the last three together, preload the spring over the lug on the adjusting plate. Takes a bit of hand/finger strength to do this. Once done, it should stay together as an assembly as the spring preload wants to keep it all together. It should look like the assembly above during the disassembly process.
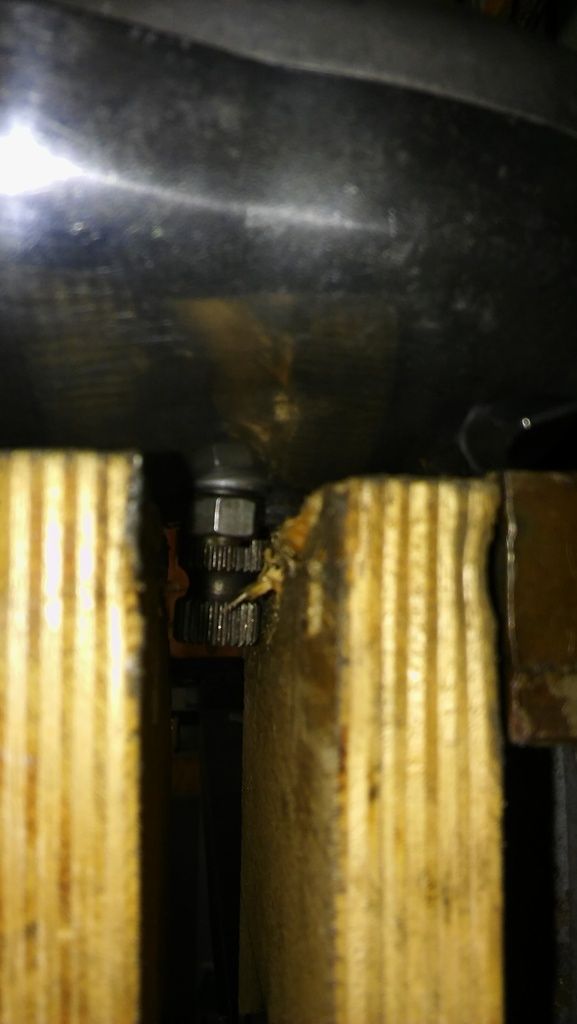
The release spring will try to push the shaft upward. So this is where the trick comes in. Press down on the shaft so that it is as far into the case as possible. There is a shoulder on the shifter shaft (fork controlling spindle) that should be tight against the adjusting plate. While holding the shaft down, clamp the splined end in the vise with the case pressed tighly against the jaws. If you do it right, when you tighten the vise and let go, it will look like it did during the disassembly process.
Now you simply install the rest of the parts, drop the cover on and tighten the bolts. Easy-peasy.
regards,
Rob
As I worked thru it, I realized that there is a trick that makes it much easier to do. So thought I'd share it.
But first, lets use the trick to make dissembly easy. If you have never done one of these before, this trick should make it easier and allow you to observe how the pieces come apart.
First, you need a set of robust wood or aluminum jaws in your vise. I have wood.

Now, with the shift pedal removed, place the splined shaft in the vise jaws so that the eccentric nut and washer clear the jaws. Here is a shot showing that.

Now make sure the case is down tight on the jaws and tighten the vise.
With that done, you remove the three cover screws and tap on the cover to remove it. It should come off with little effort.
With the cover off, this is what you will find.

Now you can remove the following pieces.
Fork pusher spring
Selector control fork
Gear selector
Any shims/washers
With those parts removed, this is what you will have remaining

You can lift out that assembly as one piece once you loosen the vise jaws.
Here it is still assembled. Note the position of the spring ends relative to the ear on the adjusting plate. The spring will pop off with a little persuasion and the pieces will come apart.


Assembly is the reverse order.
First, you need to install the eccentric piece with nut and washer if you have removed it. Then assemble the splined shifter shaft, adjusting plate and releasing spring into the side cover. Using the cover to hold the last three together, preload the spring over the lug on the adjusting plate. Takes a bit of hand/finger strength to do this. Once done, it should stay together as an assembly as the spring preload wants to keep it all together. It should look like the assembly above during the disassembly process.
The release spring will try to push the shaft upward. So this is where the trick comes in. Press down on the shaft so that it is as far into the case as possible. There is a shoulder on the shifter shaft (fork controlling spindle) that should be tight against the adjusting plate. While holding the shaft down, clamp the splined end in the vise with the case pressed tighly against the jaws. If you do it right, when you tighten the vise and let go, it will look like it did during the disassembly process.
Now you simply install the rest of the parts, drop the cover on and tighten the bolts. Easy-peasy.
regards,
Rob
Return to “Ducati Singles Main Discussions (& How to Join)”
Who is online
Users browsing this forum: Paul1098 and 145 guests