Hello Rob,
i have seen your frame is an early frame from 61 or 62.
If you have the original engine, it should bee a four speed.
Karsten
New 250 Project Adventure
Moderator: ajleone
-
Bevel bob
- Posts: 1056
- Joined: Thu Apr 15, 2010 8:01 am
- Location: Bromley Kent UK.
Re: New 250 Project Adventure
The case damage could be welded. The loose bearing housing could be plated to make a better fit ,but from memory if the big shim above and the gasket thickness are carefully matched to work together the bearing housing should be clamped down by the tower housing. You may need to get a non std shim/gasket made ( but this is fairly normal for this motor anyway!). The crank will be full of sludge too.
-
Snakeoil
- Posts: 109
- Joined: Fri Jun 17, 2016 12:10 pm
- Location: Upstate NY
Re: New 250 Project Adventure
Great input, thanks.
When you say shim, looking at the parts diagram for the lower bevel bearing assembly (book calls is Bush with bearings), I don't see a shim called out. But I do see a thrust washer. It appears to go between the top of the top bearing and the flange. Is that what you are talking about? Or are you saying I need to add a custom shim?
Is the early frame better or worse than the correct frame for this engine?
Thanks,
Rob
-
KarstenH
- Posts: 71
- Joined: Sun Nov 20, 2011 5:44 pm
Re: New 250 Project Adventure
Hello Rob,
the earlier frame is not worse - you have only two extra holes with threads between the rear shock mounts and the big down tube.
What for a gear box do have - four or five speed?
If you need - i have a good 4-speed case with gear box - should cost 300 € with gears.
Your engine number should be a lower 80.000. The DM 250 numbers started with 80.000.
Regards Karsten
-
double diamond
- Posts: 557
- Joined: Thu Apr 28, 2011 1:20 am
Re: New 250 Project Adventure
Rob, you have a good starting point there but a long way to go. You’re lucky the engine still had oil in it and no signs of water damage. First, identifying what you have: it does appear to be an early frame (as pointed out by Karsten) since the frame has two tapped holes at the midpoint of the seat rail, for attaching a passenger seat strap. These early frames were usually painted blue or gold but there are few absolutes with some of these specifications. Also, the rear sprocket plate is smooth so you probably have a 7-fin (between the spoke flanges) rear hub which was typical of earlier models. Is the front hub also 7-fin? Looks like it might be a later 3-fin hub. Faux air scoop on the speedo drive plate or smooth? What are the manufacturer stamps on your rims? You should notice them when you clean the rust off. Is the horn an Aprilia or CEV? I’ve only seen Aprilia horns on very early Monzas. There may also be a year date stamped on the front brake stay lug on the right side fork slider. I presume there is no foil I.D. tag on the steering head since you didn’t mention. With a chassis this early, I would expect an early type 4-speed transmission. If this is the case, the engine number will be stamped on the left side of the center cases in front of the cylinder, with DM250 on the right side. Your question regarding the “DM” engine number is pretty simple: DM250M3 was only used on the late Mk3 model, DM250M1 was the marking for the Mach 1 and early Mk3. All other 250 production models were marked DM250 with a variety of serial number sequences ranging from 8XXXX to 10XXXX. What are the numbers/orientation of your engine? There is a registry posted on the BevelHeaven website for what it’s worth. The frame tab you asked about is the stop for the rear brake pedal; the center stand stop is a rubber bumper (frequently missing) on the underside of the rear footpeg tube. This tube is still present on your frame but the footpeg mounts have been cut off. Front footpeg tube has definitely been bent/straightened on both sides, which is pretty common and a clue to the crack in you r primary cover. The fenders and muffler are not original; front fender looks Japanese, rear fender might be original but if so it’s been shortened. Another of the parts on your 160 that would be the same as your 250 is the taillight. There is a volume of information on this site regarding alternative electrical systems. I’ve seen various paint dot markings (such as those on your connecting rod) on early motors but the significance is known only to the factory. The ball bearings in the clutch are likely from the clutch release rod arrangement which uses an assortment of balls and various length rods; the ball bearings are fitted between the rods. The lower bevel bearing cartridge movement is actually a good sign. They are frequently rusted in place. Sometimes they require a special puller to remove; sometimes they just slide out. The lower tower flange holds the cartridge in place but there is a gasket between the flange and the center case. In order to compensate for the thickness of the gasket/machining tolerances of the flange and center case, a stack of shims is placed on top of the bearing cartridge flange to get the proper amount of preload on the cartridge to prevent it from rotating in the case. It’s always great to see another of these bikes brought back to life. Matt
-
Snakeoil
- Posts: 109
- Joined: Fri Jun 17, 2016 12:10 pm
- Location: Upstate NY
Re: New 250 Project Adventure
Rob, you have a good starting point there but a long way to go. You’re lucky the engine still had oil in it and no signs of water damage. First, identifying what you have: it does appear to be an early frame (as pointed out by Karsten) since the frame has two tapped holes at the midpoint of the seat rail, for attaching a passenger seat strap. These early frames were usually painted blue or gold but there are few absolutes with some of these specifications. Also, the rear sprocket plate is smooth so you probably have a 7-fin (between the spoke flanges) rear hub which was typical of earlier models. Is the front hub also 7-fin? Looks like it might be a later 3-fin hub. Faux air scoop on the speedo drive plate or smooth?
Understood about the frame. Black paint does appear to be factory type paint. But given the number of years that have passed, any old paint would look original. So, I'll see if I can find any indication of a different color. Yes, foil is gone.
Believe both hubs are 7 fin. I'm going from memory after having just cleaned the bike two days ago. Front brake plate has faux air scoops.
What are the manufacturer stamps on your rims? You should notice them when you clean the rust off. Is the horn an Aprilia or CEV? I’ve only seen Aprilia horns on very early Monzas. There may also be a year date stamped on the front brake stay lug on the right side fork slider. I presume there is no foil I.D. tag on the steering head since you didn’t mention. With a chassis this early, I would expect an early type 4-speed transmission. If this is the case, the engine number will be stamped on the left side of the center cases in front of the cylinder, with DM250 on the right side. Your question regarding the “DM” engine number is pretty simple: DM250M3 was only used on the late Mk3 model, DM250M1 was the marking for the Mach 1 and early Mk3. All other 250 production models were marked DM250 with a variety of serial number sequences ranging from 8XXXX to 10XXXX. What are the numbers/orientation of your engine? There is a registry posted on the BevelHeaven website for what it’s worth.
Will have to check the rim stamps. Horn has an oval lable on the front. Markings were worn and I did not take a close look. Will do so tomorrow.
Engine is a 5 speed with a 97XXX serial number. This makes the engine a '66. DM250 on left case which corresponds with a 5 speed from what I've read so far. I found the registry that you have mentioned.
The frame tab you asked about is the stop for the rear brake pedal; the center stand stop is a rubber bumper (frequently missing) on the underside of the rear footpeg tube. This tube is still present on your frame but the footpeg mounts have been cut off. Front footpeg tube has definitely been bent/straightened on both sides, which is pretty common and a clue to the crack in you r primary cover. The fenders and muffler are not original; front fender looks Japanese, rear fender might be original but if so it’s been shortened.
When you say footpeg mounts have been removed, I believe you mean passenger pegs. Only the left one has been cut. The other was being used to mount the muffler. I realize that the muffler is an aftermarket cocktain shaker muffler like a Bates. Interesting about the front fender. It fits well. But the fork mount brackets had a plate welded to them with the holes for the studs and then painted silver. Looked factory, but it was not easy to remove and not what I would have expected from a factory item. Being incorrect makes sense.
Was not aware rear had been cut. Original back lip is still there. This would explain extra holes. I looked at pics of original bikes and now see that it is short.
The lower bevel bearing cartridge movement is actually a good sign. They are frequently rusted in place. Sometimes they require a special puller to remove; sometimes they just slide out. The lower tower flange holds the cartridge in place but there is a gasket between the flange and the center case. In order to compensate for the thickness of the gasket/machining tolerances of the flange and center case, a stack of shims is placed on top of the bearing cartridge flange to get the proper amount of preload on the cartridge to prevent it from rotating in the case. It’s always great to see another of these bikes brought back to life. Matt
Well, that is good news about the cartridge. The fitting shims/gasket makes sense. I can machine a single shim to keep it in place. The friend that I bought this from has been into bikes all his life and was a Husky and KTM dealer at one time. All his bikes are stored indoors. But he is not a restoration kinda guy. He often modifies bikes to suit his needs. He's very clever and held a pro flat track number for several years. My goal was not to restore the bike. But if I can get the correct parts, I might take that path in a modified form. All depends what we find in his container when we take the trip out in a week or so.
Thanks for all the great info.
regards,
Rob
-
Nick
- Posts: 243
- Joined: Sat Jun 01, 2013 4:57 pm
- Location: Paradise

-
ajleone
- Posts: 230
- Joined: Sat Oct 31, 2009 11:20 pm
- Location: Pittsford, NY
- Contact:
Re: New 250 Project Adventure
Rob,
Lots of good info, data and pics in Tom Baileys book. You can find them on eBay or his website http://motyeliab.com
There is also some details about the early type "A" frames (which I don't think yours is) and pics which will be useful in your rebuild. If your engine SN is 97xxxx you most likely have a 67-68 but this is a topic often debated. You see a lot of discrenpacies in the bevel register list, so I would take that info with a grain of salt.
Keep posting pics of your project!
Tony
-
Snakeoil
- Posts: 109
- Joined: Fri Jun 17, 2016 12:10 pm
- Location: Upstate NY
Re: New 250 Project Adventure
Very nice bike, Nick. But not the path I want to take. I'm leaning more toward a road racer design. It will be a compromise for comfort, maybe clubmans or narrow Euro bars like you would see on an early Triumph if I don't stay with a stock look. I do see the swingarm support extensions have been added to your frame. A member of the Bevelheads list mentioned these as an improvement I might consider. I also see that your points cover has two spring ears holding the cover down. Is that your improvement or something that was done on later bikes? I've noticed it on a few others and thought I was missing one of the extended studs but then see that the parts book only calls out one.
Thanks for the tip on the book, Tony. I have been disappointed with book on other marques in the past. So, I tend to shy away from books like that. But since you say it has good info, I'll take a look.
Since the engine number will define the model year for the registration, that would make it the angular sheetmetal version and I'm not crazy about that look. No offense to those who have that model 250. It's just not something that suits my tastes. So, even if I stay with a stock Ducati look, it won't be the correct look for that engine.
Headed over to my friend Lance's shop to use his tools and tear apart the rest of the bottom end. He was a dealer until Berliner went away. Said he probably still has NOS spares for the engine in his shop. Said last time he worked on a Ducati single was sometime in the early 70's. He throws nothing out so I know the tools are there. Might take a little searching to to find them all, though.
regards,
Rob
-
Snakeoil
- Posts: 109
- Joined: Fri Jun 17, 2016 12:10 pm
- Location: Upstate NY
Re: New 250 Project Adventure
Engine is apart. At least one surprise and one somewhat expected surprise. More on that later.
Lance did not have the clutch hub tool or at least we could not find it. But I pair of channel locks and an impact wrench spun the nut off. Same for the other remaining nuts on various shafts. Only no channel locks were required. Did need the special puller to remove the alt rotor. Not sure it would be wise to use a generic puller. Decent chance of damaging the stator if the jaws were too deep.
Rotor looks like new. Stator also looked excellent. Here's the stator.
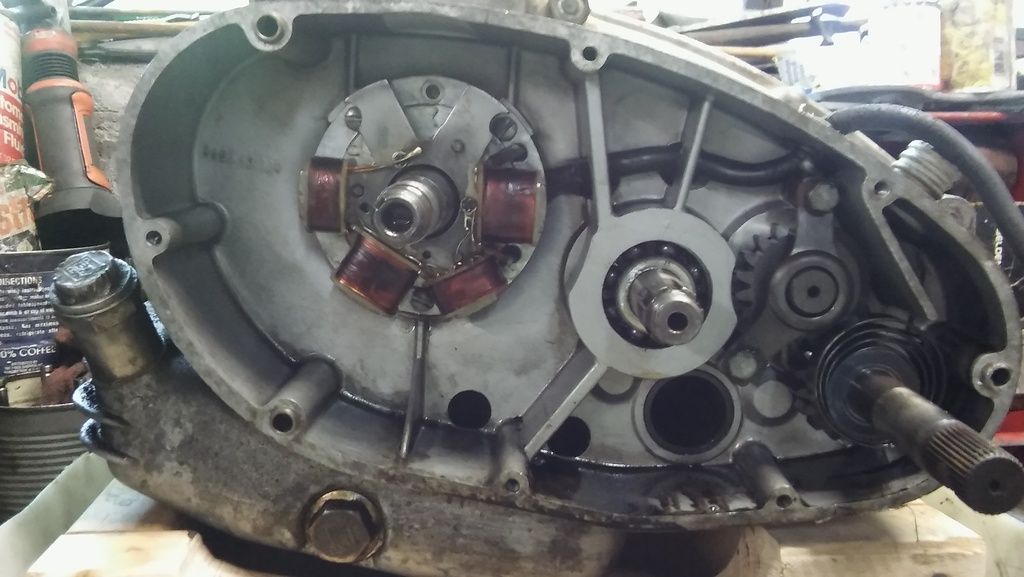
Did learn that the lower bevel drive and bearing cartridge is not removable until you split the cases.
All the gears came off with a little finger pressure. Primary, timing and bevel gears all looked great. Will inspect closer as I clean the various parts.
Split the cases by tapping on the crank and tranny shafts with a nylon hammer. The previous assembler was a silicone-aholic. It is everywhere. Every seal, bolt, and gasket was put in with silver silicone. And he used plenty of it. Every bolt looked like it had a silver o-ring on it. Found globs behind seals and there was a bead of silicone running around the entire inner edges the case joint. The good news is it made it easy to split the cases and remove old gaskets.
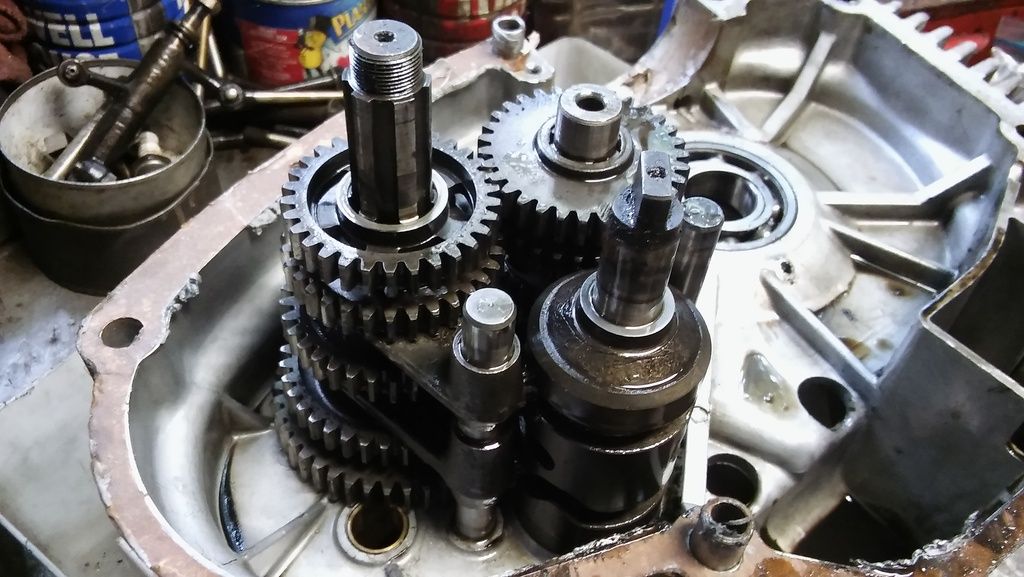
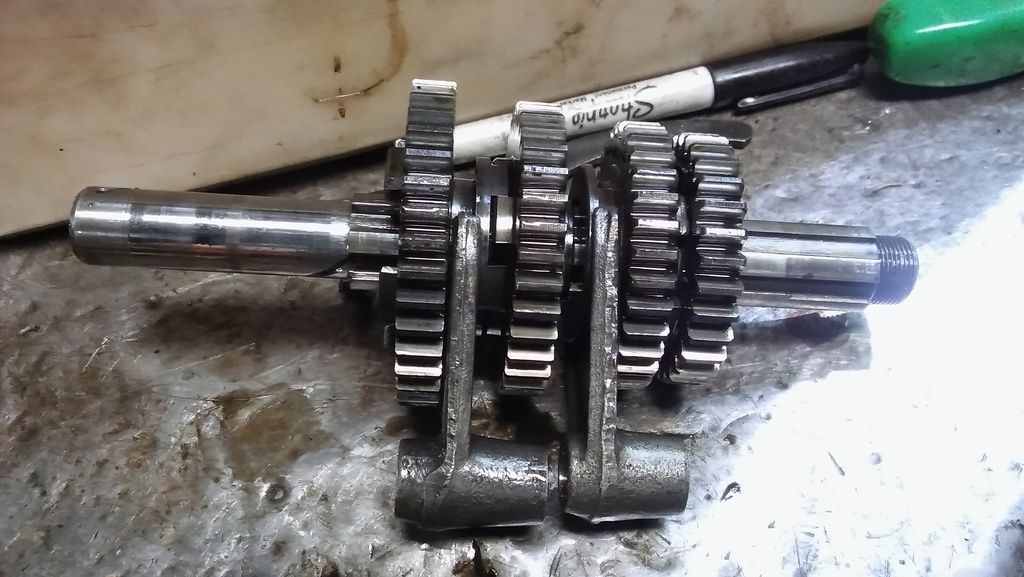
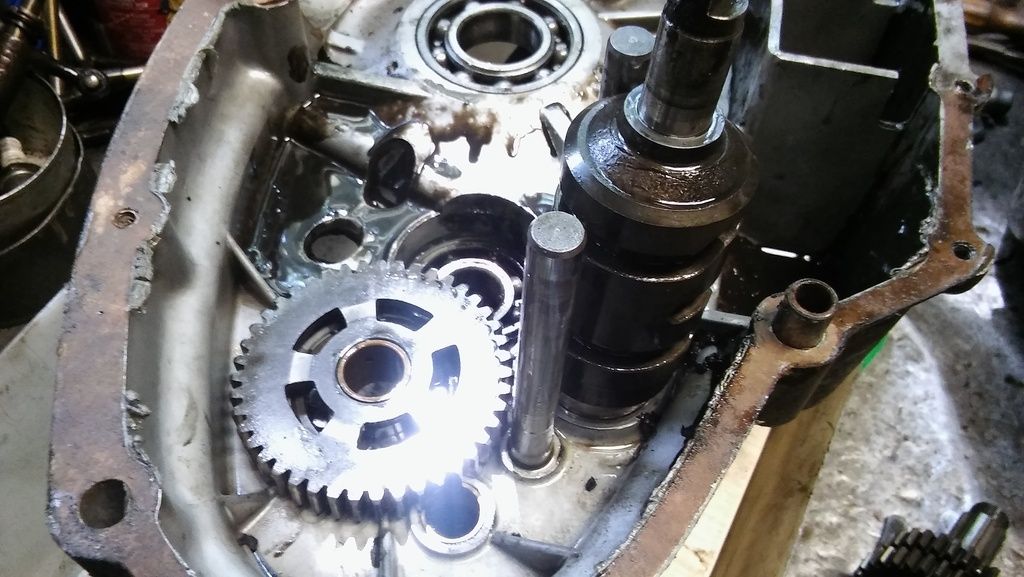
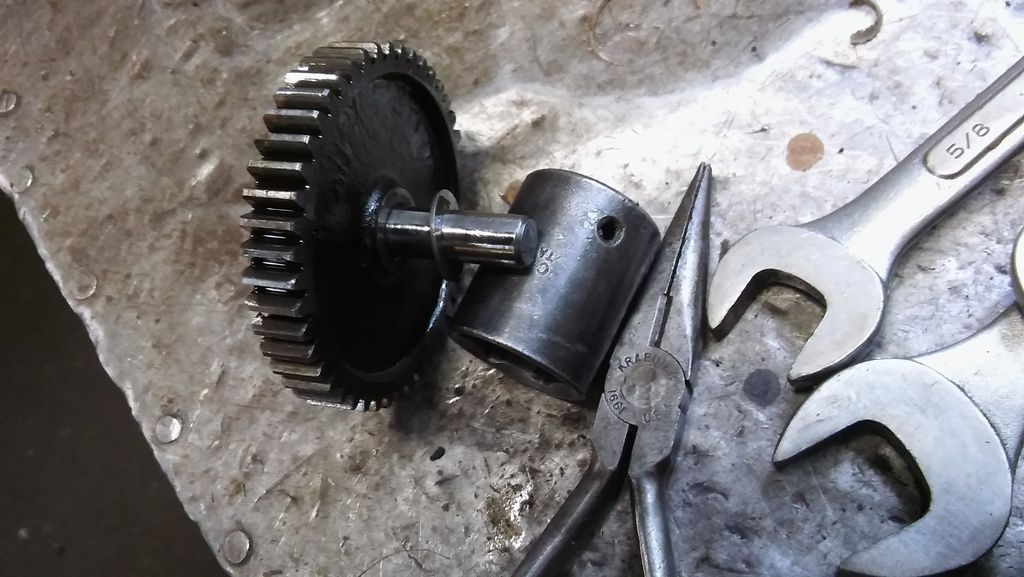
With the cases split, this revealed the crank and the tranny. Here's the tranny. Did not take a pics of the drum. It looked like a NOS part. Even Lance was impressed. He picked it up and started to say, "These tend to wear in this... Damn, this thing looks NEW!!"
I knew that Ducati has a thing for shims. So, I was on the lookout for them. Here's a few pics of various shims found during the dissassembly.
My method was the photo every shim and then package on the shaft where it belongs. Everying is bagged and labled using ziplock bags.
Now, as promised, here is surprise No. 1. I'll preface this with Lance was a BSA, Triumph, Ducati, Guzzi, CZ, Moto Beta, Norton, Mustang and Rickman dealer for over 45 years. When I showed him this, he said it was a first for him.
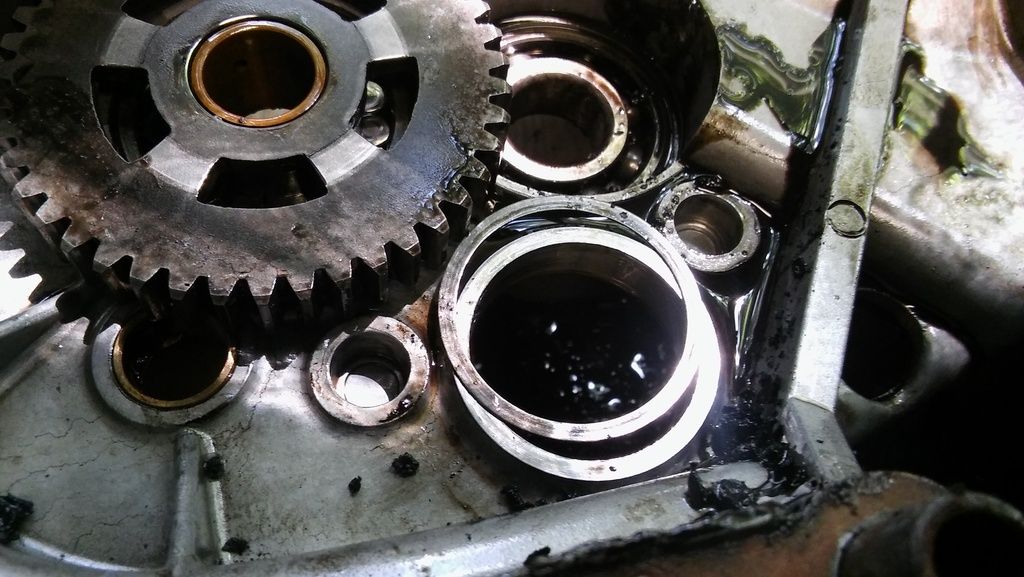
When I split the cases, first thing I did was look for debris or broken bits in the bottom of the cases. That's when I spotted this.
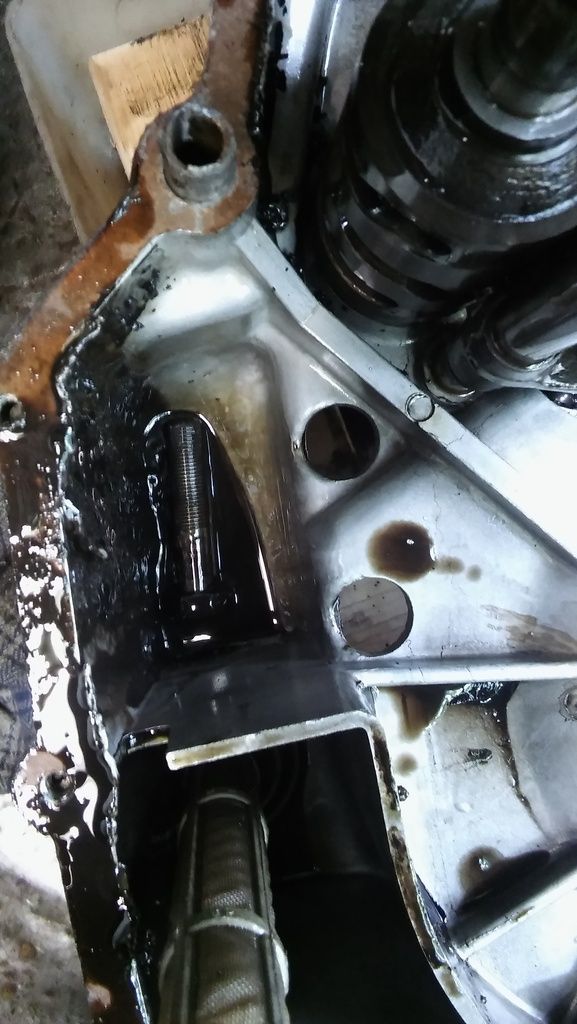
Don't see it? Maybe this will help.
All I can say is "What tha????" At first, I thought maybe the engine was slapped together to sell as a barn find years ago. But the gasket had been carefully sealed. So, it has to be one of two possibilties. First is a bolt fell into the case when the guy building it was out of the room. The other is after the case halves were assembled, a bolt fell into an opening in the case and into the inner sump area. There are two huge holes in the bottom of the right case half so it is possible for that bolt to have fallen in there. Could have been a accident or intentional. We'll never know. It never did any damage.
When I got the bevel drive and bearing cartridge out, it was snug for the last bit, but came out okay. Shims above and below the bearings were there. Nice thing about this engine is other than the first gear bearing, all the bearings look like standard size metric bearings. So not expensive to reaplace all of them if that is the required. Although I suspect most are fine.
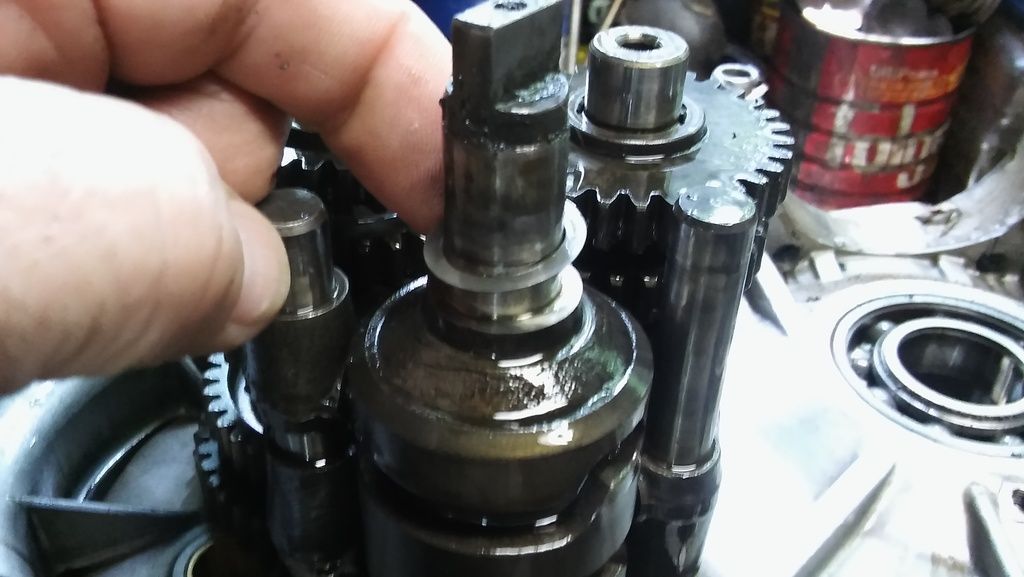
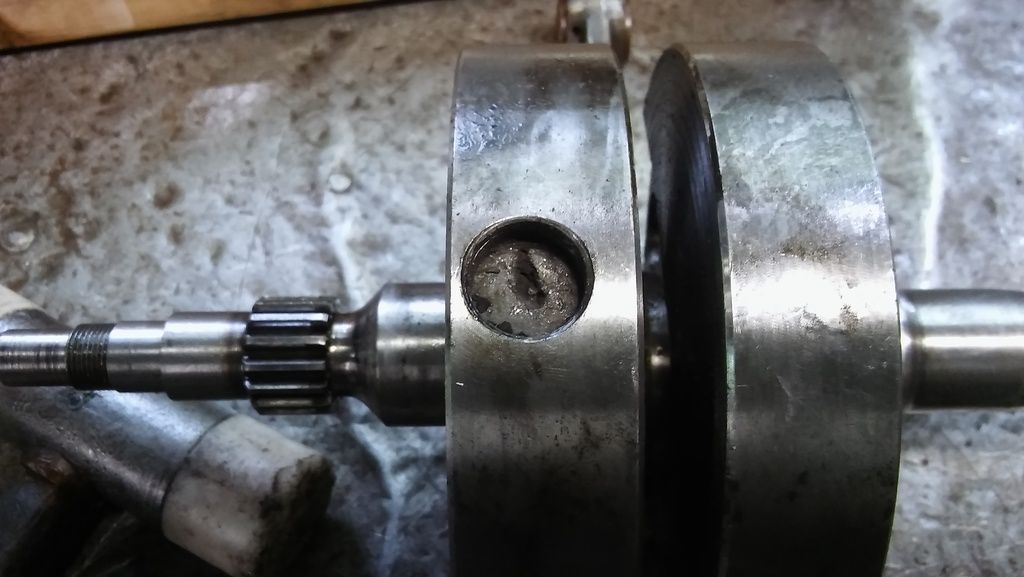
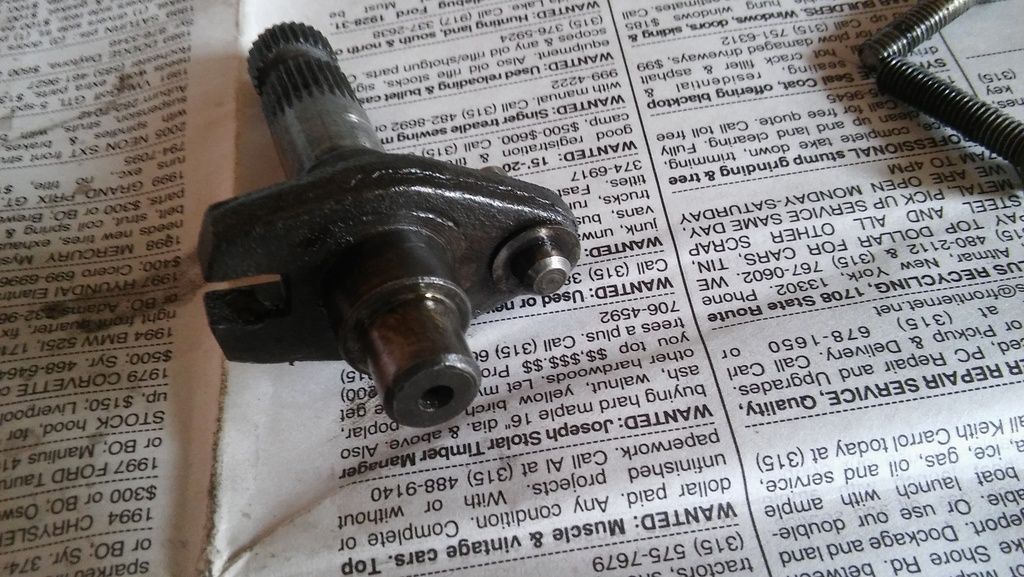
Lastly is the crank. Looks great. Rod big end does not have excess play either laterally or radially. Small end is dirty, but looks fine. Measurements and check of a new wrist pin will determine it's fate. I did find another pair of white dots on one of the welch plugs for the big end. So, I'm guessing it is a balance coding from the factory.
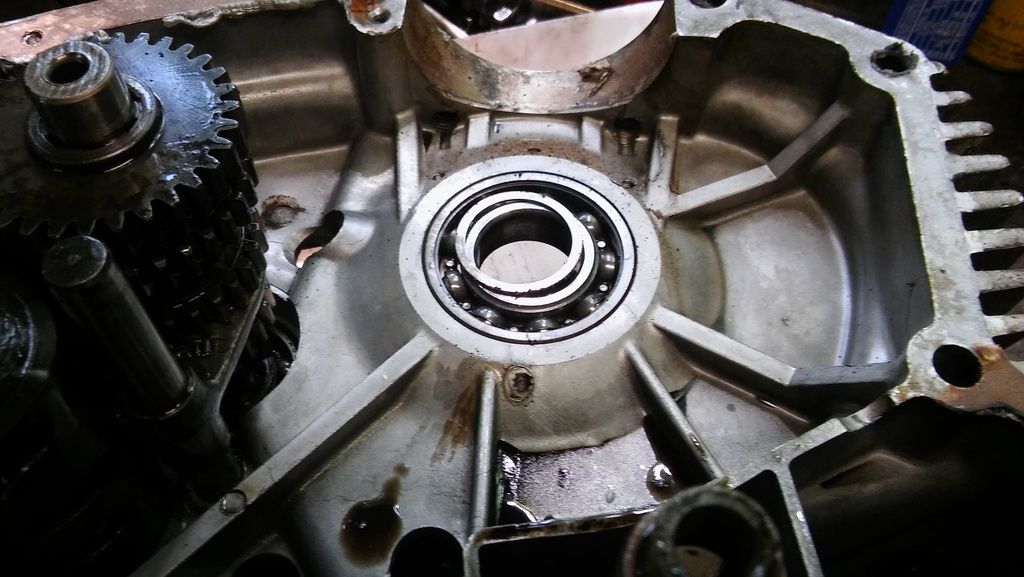
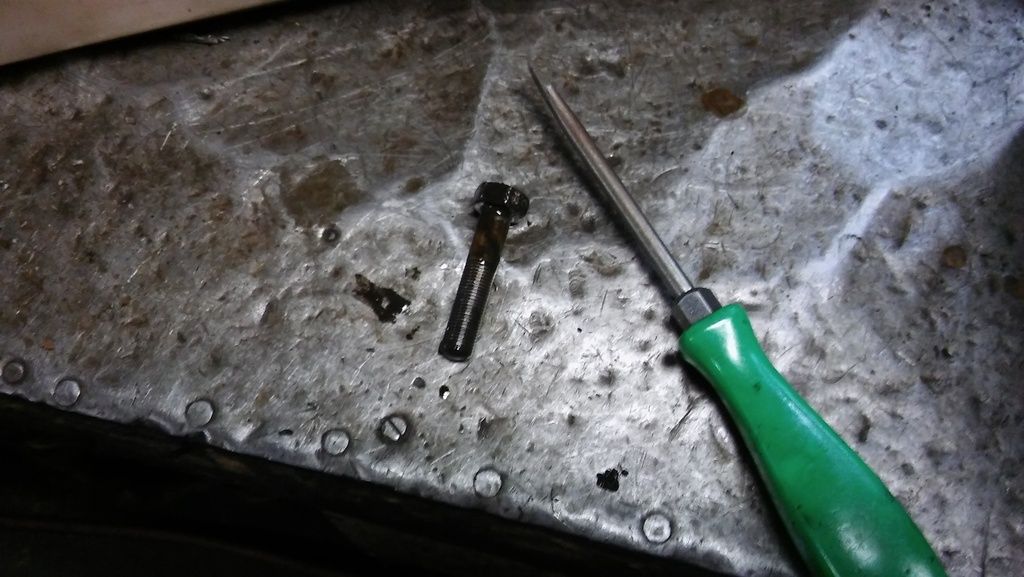
This is where semi-surprise No. 2 comes in. I pulled the plug from the sludge trap and I thought it had never been drilled. Looked like a flat steel surface behind it. Lance chuckled and dug into it with his knife. Oops, hardended crud. I'll be going after that in a day or so. Need to put a purge of air on the oil feed side to keep the crud from moving up into the oil gallery and into the big end. Will also rig my shop vac to help pull the bits out as I chip away at them with a dental tool. Here's the trap with the plug removed.
So, next is giving the engine and tranny parts a nice, warm bubble bath followed by a blow dry and some baby powder while playing a little Kenny G in the background. Then I'll go over them again to look for any issues.
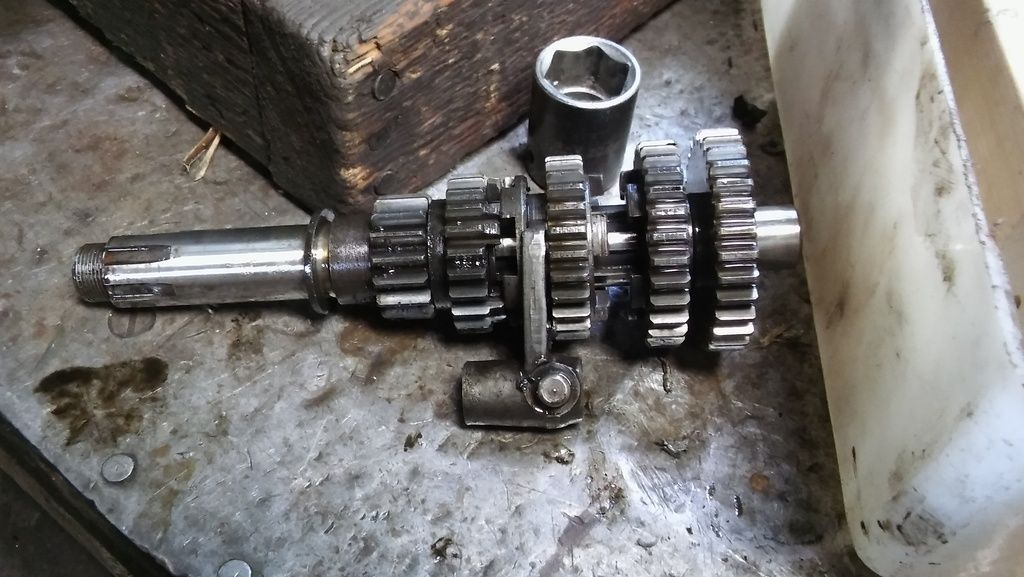
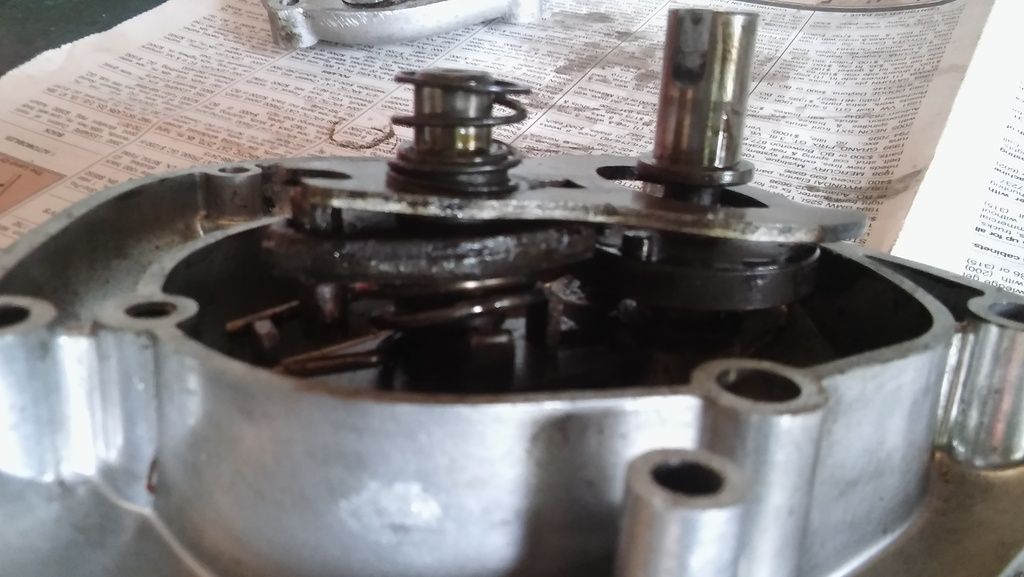
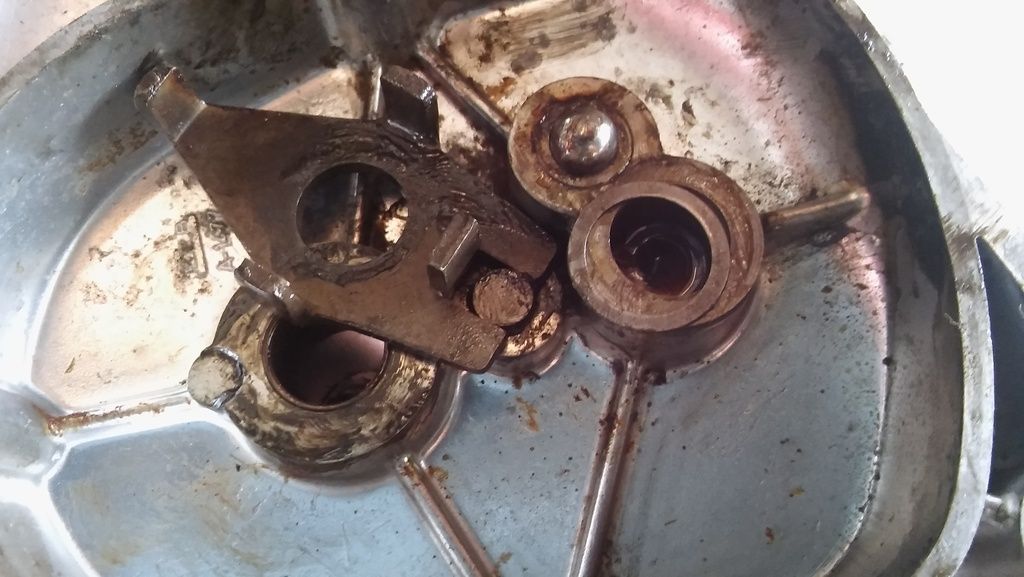
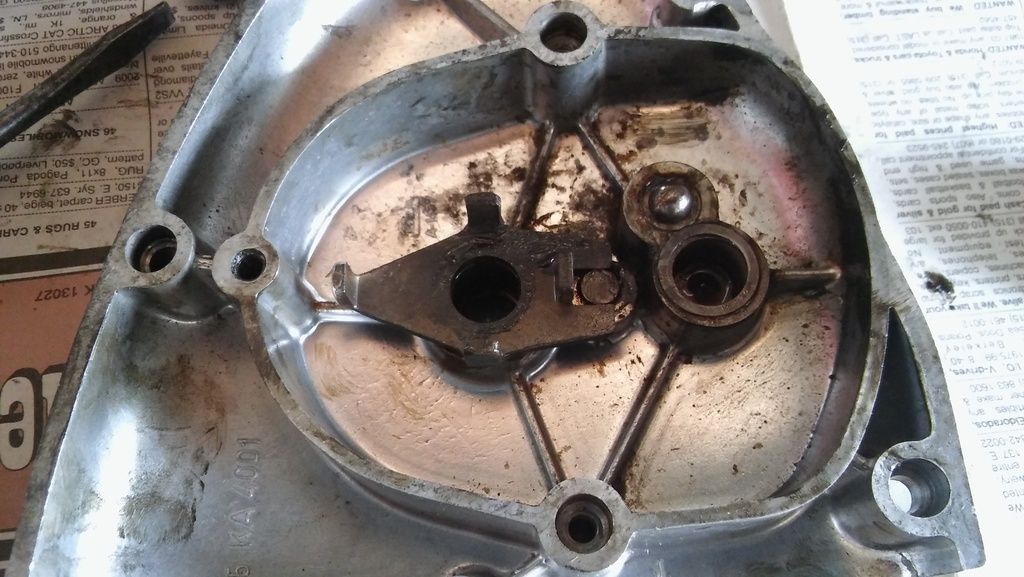
I forgot to provide a report on the shifter mechanism, which I did yesterday. So, here it is. Once apart, all the bits and pieces looked in excellent condition. No abnormal wear. Really no wear at all, just a bit of polising on mating surfaces. Here's a few pics.
And a correction to a previous post above. I checked my hubs and they are 4 fin in the rear and 3 fin in the front.
That's all for now.
regards,
Rob
Lance did not have the clutch hub tool or at least we could not find it. But I pair of channel locks and an impact wrench spun the nut off. Same for the other remaining nuts on various shafts. Only no channel locks were required. Did need the special puller to remove the alt rotor. Not sure it would be wise to use a generic puller. Decent chance of damaging the stator if the jaws were too deep.
Rotor looks like new. Stator also looked excellent. Here's the stator.

Did learn that the lower bevel drive and bearing cartridge is not removable until you split the cases.
All the gears came off with a little finger pressure. Primary, timing and bevel gears all looked great. Will inspect closer as I clean the various parts.
Split the cases by tapping on the crank and tranny shafts with a nylon hammer. The previous assembler was a silicone-aholic. It is everywhere. Every seal, bolt, and gasket was put in with silver silicone. And he used plenty of it. Every bolt looked like it had a silver o-ring on it. Found globs behind seals and there was a bead of silicone running around the entire inner edges the case joint. The good news is it made it easy to split the cases and remove old gaskets.
With the cases split, this revealed the crank and the tranny. Here's the tranny. Did not take a pics of the drum. It looked like a NOS part. Even Lance was impressed. He picked it up and started to say, "These tend to wear in this... Damn, this thing looks NEW!!"


I knew that Ducati has a thing for shims. So, I was on the lookout for them. Here's a few pics of various shims found during the dissassembly.


My method was the photo every shim and then package on the shaft where it belongs. Everying is bagged and labled using ziplock bags.
Now, as promised, here is surprise No. 1. I'll preface this with Lance was a BSA, Triumph, Ducati, Guzzi, CZ, Moto Beta, Norton, Mustang and Rickman dealer for over 45 years. When I showed him this, he said it was a first for him.
When I split the cases, first thing I did was look for debris or broken bits in the bottom of the cases. That's when I spotted this.

Don't see it? Maybe this will help.

All I can say is "What tha????" At first, I thought maybe the engine was slapped together to sell as a barn find years ago. But the gasket had been carefully sealed. So, it has to be one of two possibilties. First is a bolt fell into the case when the guy building it was out of the room. The other is after the case halves were assembled, a bolt fell into an opening in the case and into the inner sump area. There are two huge holes in the bottom of the right case half so it is possible for that bolt to have fallen in there. Could have been a accident or intentional. We'll never know. It never did any damage.
When I got the bevel drive and bearing cartridge out, it was snug for the last bit, but came out okay. Shims above and below the bearings were there. Nice thing about this engine is other than the first gear bearing, all the bearings look like standard size metric bearings. So not expensive to reaplace all of them if that is the required. Although I suspect most are fine.
Lastly is the crank. Looks great. Rod big end does not have excess play either laterally or radially. Small end is dirty, but looks fine. Measurements and check of a new wrist pin will determine it's fate. I did find another pair of white dots on one of the welch plugs for the big end. So, I'm guessing it is a balance coding from the factory.
This is where semi-surprise No. 2 comes in. I pulled the plug from the sludge trap and I thought it had never been drilled. Looked like a flat steel surface behind it. Lance chuckled and dug into it with his knife. Oops, hardended crud. I'll be going after that in a day or so. Need to put a purge of air on the oil feed side to keep the crud from moving up into the oil gallery and into the big end. Will also rig my shop vac to help pull the bits out as I chip away at them with a dental tool. Here's the trap with the plug removed.

So, next is giving the engine and tranny parts a nice, warm bubble bath followed by a blow dry and some baby powder while playing a little Kenny G in the background. Then I'll go over them again to look for any issues.
I forgot to provide a report on the shifter mechanism, which I did yesterday. So, here it is. Once apart, all the bits and pieces looked in excellent condition. No abnormal wear. Really no wear at all, just a bit of polising on mating surfaces. Here's a few pics.


And a correction to a previous post above. I checked my hubs and they are 4 fin in the rear and 3 fin in the front.
That's all for now.
regards,
Rob
Return to “Ducati Singles Main Discussions (& How to Join)”
Who is online
Users browsing this forum: No registered users and 137 guests