Troubleshooting an electrical issue led me to my alternator wires.
The main jacketing was wrapped like mummy with electrical tape. I unwrapped a couple inches of the tape and found that the three internal wire's jacketing is crubling at every bend.
I presume I have to remove the clutch basket and the alternator to change the wires, right?
Any special tools I will need?
Any pitfalls I should be aware of?
Thanks,
Jim
Replacing the alternator wiring.
Moderator: ajleone
-
JimF
- Site Admin
- Posts: 1144
- Joined: Fri Oct 23, 2009 2:49 am
Replacing the alternator wiring.
You do not have the required permissions to view the files attached to this post.
-
DewCatTea-Bob
- Posts: 2897
- Joined: Sun Nov 01, 2009 10:53 am
- Location: Near SE side of Lake Michigan
Re: Replacing the alternator wiring.
" and found that the three internal wire's jacketing is crubling at every bend. "
____ Unfortunately (for the past three decades), it has become a common-problem to find that the insulation-coating on the alt.wire-leads has so deteriorated, even underneath the alt.cable-conduit. _ Before the 90's, the cracking-up of that insulation-material was limited to only that exposed to the outdoor-air, and that which was still well covered by the black-rubber cable-conduit would still be pretty-much as good-as-new -(fully pliable, no loss of color, etc.). _ So complete alt.cable replacement was then not required.
Also (back in past years), I've found that most all the insulation of the alt.wire-leads that was down-INSIDE of the motor-casing, would still be in pretty-good condition (for motors that were kept together in running-condition). _ So wire-lead replacement would only be really needed for just the alt.cable which was external of the motor. _ However these-days, it's doubtful that such limited repair-work could be trusted for long (if even still doable). _ But still, it's quite likely that (while the insulation-coating will still crackle-up & break-off, IF bent), the old wire-coating will remain-put & continue to insulate & separate the individual wire-conductors within the alt.cable-conduit, if left undisturbed. _ So if left alone, that insulation-issue is likely not worth bothering-with WITHIN the motor-casing (just on it's own...). _ In other words, complete replacement of all the alt.wire-leads entirely, may be a job left for whenever there's also some other work-job which requires attention within the left-side motor-case as well.
__ To determine if this issue really needs attention all on it's own (within the motor-case), ya need to test the alt.wire-leads for electrical-leakage...
In this case for the Mk3/40-watt alt.stator, (with the use of an ohm-meter), neither the white or yellow wires should have any leakage to the red-wire or ground, and should have about .6-ohms to each-other (which would otherwise be considered as severe leakage).
If the wire-leads pass a leakage-test, then there's really no REQUIRED reason to tear-into the motor so extendedly during the riding-season.
" I presume I have to remove the clutch basket and the alternator to change the wires, right? "
____ Right ! _ (And that's why ya don't really want to get into it, if ya don't actually have-to [during riding-season]).
The primary gear-set has to be removed and the alt.rotor pulled-off, in order to get the alt.stator removed for wire-lead replacement.
__ Another job that may help make it worth-while to remove the clutch, is to rotate the arrangement of it's plates...
The inner-most plate has it's inner-most/right-side left unused, and so to get extended life out of it, it ought to be flipped-over ! _ I always place it so that it's virgin-side is then mated to the outermost steel-plate -('pressure-plate'),, and also place the friction-plate surface which WAS mated against the pressure-plate, inward, to the inner-most position (where IT will then become left out of function), instead.
" Any special tools I will need? "
____ A flywheel-puller at least, (and the special-tool for holding the clutch-drum would be nice to have).
Ya can find a factory-like rotor-puller on eBay for about 50-bucks.
" Any pitfalls I should be aware of? "
____ Well, something most inexperienced Duke-wrenchers don't think to do BEFORE pulling the alt.rotor, is to place an alignment-mark on the rotor-hub, placed so as to be aligned with the TDC-notch on the tip-end of the crankshaft (or rather the corresponding 'key-way slot'). _ Doing so will prevent loss of the original/(working!) factory-timing of the alt.rotor (to the crankshaft).
Dukaddy-DUKEs,
-Bob
PLEASE NOTE... If this-post is not-yet signed-off with '-Bob', then I'm still in the process of completing it,, and if not also included with 'DCT' near bottom as well, then I may edit this post's wording at a later time. - Dct.Bob
-
JimF
- Site Admin
- Posts: 1144
- Joined: Fri Oct 23, 2009 2:49 am
Re: Replacing the alternator wiring.
I agree with you about the typical condition of the alternator wires, having been protected from UV rays and the like by the outer jacketing, as usually being good just beyond the end of the outer jacket. I have indeed stripped the outer jacket back several times and to my dismay the jacketing on the inner conductors is crumbling to the touch throughout.
I could do that intermediate level of repair wherin I just hope the outer jacket's compression prevents the inner jackets from disintegrating, but it would bother me to no end and is not the way to correctly repair the problem.
At this point I will begin to collect the tools I need for the job.
Is there any call for this repair job to be a small web page within the technical pages of this site?
-
DewCatTea-Bob
- Posts: 2897
- Joined: Sun Nov 01, 2009 10:53 am
- Location: Near SE side of Lake Michigan
To Replace ALL the Alt.cable-wiring, or Not ?
" I agree with you about the typical condition of the alternator wires, having been protected from UV rays and the like by the outer jacketing, as usually being good just beyond the end of the outer jacket. I have indeed stripped the outer jacket back several times and to my dismay the jacketing on the inner conductors is crumbling to the touch throughout. "
____ I'm familiar with the that severe deterioration of the insulation-coating/wire-jacket material, but have never really given much thought as to the actual cause of the issue being due to anything other than accumulated oxidization. _ The thought of the cause being at least influenced by UV (or other type of penetrating cosmic-rays) could possibly better explain why the insulation-coating's material-deterioration is kept minimized within the metal-alloy motor-casing (where such rays don't so easily penetrate).
But now that I really think about all of the related wire-insulation material-deterioration I've seen on the original Ducati alt.wiring, I'm now thinking that that coating-material itself must eventually experience an age-induced chemical-breakdown (between it's very-own particular combination of insulation-coating ingredients).
__ It's already been long established that the exposed wire-insulation/jacket coating-material becomes discolored & well deteriorated by 2-decades of age (where OUTSIDE of the black-rubber cable-conduit) ! _ And with additional aging, even deteriorates within the alt.cable-conduit, as well.
It would be interesting to learn if that coating-material is equally bad or not (within the black cable-conduit), both outside AND inside the motor-casing ! _ So of those of us who replace the original alt.cable, it would be nice to read reports of your findings as to the relative condition of the original wire-insulation as it's found to be, (within the black-rubber cable-conduit), from sections which were outside compared to sections which were inside the motor-casing ! _ That way, we could then determine if the UV-damage theory is actually valid to any degree (as suspected).
" I could do that intermediate level of repair wherin I just hope the outer jacket's compression prevents the inner jackets from disintegrating, but it would bother me to no end and is not the way to correctly repair the problem. "
____ I certainly do-not disagree that the issue should not be left ignored, however I still believe that the wiring-insulation inside to cable-conduit WITHIN the motor-case is still safe to trust, (IF continued to remain left undisturbed !). _ Cuz while the conducting-wire insulation-material may be in some state of deteriorization-breakdown, I don't believe that it also significantly loses any of it's original bulk, and therefore will still provide material separation of the conducting-wires (held within the alt.cable-conduit [that's left UNDISTURBED*] ).
(* The alt.cable that's been factory-routed within the motor-case is kept stationary (& normally undisturbed !), and thus the possibility that the wire-insulation coating-material may no longer be pliable (without crackling-apart & falling-off), is not really a problem which must be fixed asap, (since inside THERE, it no-longer maters if the insulation-material has become non-pliable) ! _ However once even THAT (internally-kept) section-length of alt.cable has been pulled-out & disturbed, I sure would not trust using it ever again !)
" At this point I will begin to collect the tools I need for the job. "
____ The puller may be all that you really need, (presuming you already have a suitable socket-set).
" Is there any call for this repair job to be a small web page within the technical pages of this site? "
____ My-own guess is that there are still very many others who have yet to replace their old/deteriorated alt.wiring. _ So I'd say yes to that thought,, but to know for sure if it's worth your time & trouble to document your step-by-step progression though the entire (basic) wire-replacement process, it would be nice if at least a couple other fellows chimed-in with any such interest !
____ Something which ought to be considered when doing the alt.cable replacement-job, is rather than simply installing another '3 wire-lead' alt.cable, instead install a '4 wire-lead' cable. _ That way, there would then be more options for possibly making use of ALL the alt.power,, such as preventing all the power-juice which the ignition-system wastes, to instead possibly be used to charge a (optional) battery (for powering a horn, etc.).
Dukaddy-DUKEs,
-Bob
PLEASE NOTE... If this-post is not-yet signed-off with '-Bob', then I'm still in the process of completing it,, and if not also included with 'DCT' near bottom as well, then I may edit this post's wording at a later time. - Dct.Bob
-
ecurbruce
- Posts: 317
- Joined: Fri Apr 01, 2011 12:43 am
- Location: Hurricane mills TN
Re: Replacing the alternator wiring.
Here's the cable I found for alternator replacement, four conductor, oil resistant rubber casing, AWG 16...
https://www.ccixpress.com/webapp/wcs/st ... y_rn=12603
I soaked a piece in oil for quite a while, and no swelling of the rubber casing...
16 guage will be big enough, right? The 14/4 casing was too big to fit through the nut in the motor case, but the 16/4 fits nicely.
Bruce
https://www.ccixpress.com/webapp/wcs/st ... y_rn=12603
I soaked a piece in oil for quite a while, and no swelling of the rubber casing...
16 guage will be big enough, right? The 14/4 casing was too big to fit through the nut in the motor case, but the 16/4 fits nicely.
Bruce
-
MotoMike
- Posts: 487
- Joined: Wed Aug 04, 2010 3:40 am
Re: Replacing the alternator wiring.
will watch for that dedicated thread or continue to watch this one as my 69 450 seems to still have the original wiring installed.
mike
mike
-
JimF
- Site Admin
- Posts: 1144
- Joined: Fri Oct 23, 2009 2:49 am
Re: Replacing the alternator wiring.
I will continue to add information here as well as to make a page in the technical section.
Is a clutch holding tool still available and if so from where?
I have old clutch plates and I seem to recall someone saying they fabricated a clutch-holding tool from old plates. I would do that if I could so I could add making the tool as a side bar to making the wiring repair.
Jim
Is a clutch holding tool still available and if so from where?
I have old clutch plates and I seem to recall someone saying they fabricated a clutch-holding tool from old plates. I would do that if I could so I could add making the tool as a side bar to making the wiring repair.
Jim
-
wcorey
- Posts: 323
- Joined: Sun Jan 31, 2010 1:50 am
- Location: MA USA
Re: Replacing the alternator wiring.
On most any bike with a multi-plate clutch, a holding tool can be made by welding or bolting a few inner and outer plates together and then affix a handle of some sort in the same manor.
This ones for the more recent belt drive models...
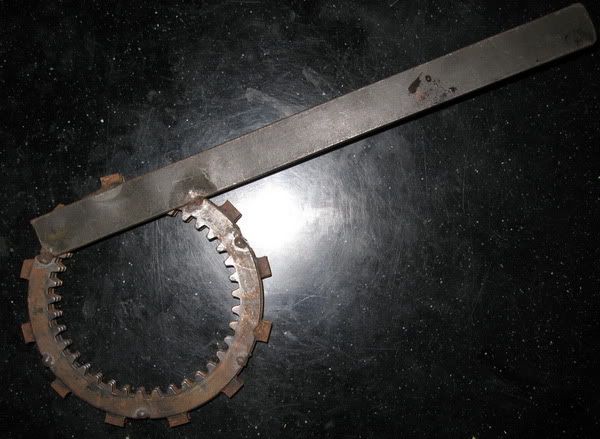
Bill
This ones for the more recent belt drive models...
Bill
-
DewCatTea-Bob
- Posts: 2897
- Joined: Sun Nov 01, 2009 10:53 am
- Location: Near SE side of Lake Michigan
Clutch-hub Nut-torquing with Mainshaft & Pinion-gear Locked
" Is a clutch holding tool still available and if so from where? "
____ I believe I once seen an eBay-seller in Aus. selling a newly-made version of one, if not, maybe 'bsanut' sells the like.
____ Back before I ever worked at any DUCATI-shop, I had found alternate methods (other than factory-tools) for doing anything needed to be done on the motor, (except for pulling the alt.rotor)...
__ For removal of the clutch-hub & drum, I'd engage the transmission (preferably into top-gear) and prop-lock the drive-sprocket (with a suitably-sized socket placed under a tooth), so as to hold the hub/main-shaft from turning (along with it's nut).
And also, to help take pressure off the transmission, I'd place a tightly wadded rag in-between the primary-gears' meshing teeth.
This dual-method works well enough, without any notable consequence.
In fact by itself, an already worn-out shop-rag folded-up tight in eight layers and tucked between the primary gear-set's meshing-teeth, will sufficiently lock-up that gear-set, all on it's own,, so that either nut (on crankshaft or main-shaft) can then be torqued-off (or on).
However for re-tightening those nuts back-down, I prefer the more fully solid feel of having the transmission locked-up in place as well (along-with the stuffed-rag method). _ Ya just pre-load the stuffed-rag resistance-pressure first, then place your chosen socket under the nearest tooth of the counter-shaft sprocket (to more solidly lock-up the transmission from turning along with the nut). _ This way, the locked in place main-shaft may then prevent the outermost layers of the rag from getting pinched-through & mashed-up (by the fully-meshing teeth).
__ Before bothering with locating a clutch-hub holder-tool, try this suggested method and see if it doesn't work quite well enough for you. _ If ya happen to have a small block of hard-wood (about the size of a 21 to 32mm socket), then that may work to adequately support/block the sprocket-tooth (instead of a [more handy] socket).
Of course (with top-gear engaged), this method can ALSO be done all on it's own (without the rag-method included). - (I-myself just don't believe in putting all my eggs in one basket, [if I don't have to].)
Dukaddy-DUKEs,
DCT-Bob
PLEASE NOTE... If this-post is not-yet signed-off with '-Bob', then I'm still in the process of completing it,, and if not also included with 'DCT' near bottom as well, then I may edit this post's wording at a later time. - Dct.Bob
Return to “Ducati Singles Main Discussions (& How to Join)”
Who is online
Users browsing this forum: No registered users and 129 guests